Speech Recognition in Scratch 3 - turning Hello into Bonjour!
The Raspberry Pi Foundation recently released a programming activity Alien Language , with support Dale from Machine Learning for Kids , tha...
PS3 Controller to move a USB Robot Arm
Guest Blogger Hiren Mistry, Nuffield Research Placement Student working at the University of Northampton. How to use a PS3 Controller to...
Scratch Robot Arm
It is not physical but CBiS Education have release a free robot arm simulator for Scratch. Downloadable from their site http://w...
Tinkercad and Microbit: To make a neuron
The free online CAD (and so much more) package Tinkercad https://www.tinkercad.com/ under circuits; now has microbits as part of the list ...
Escape the Maze with a VR robot - Vex VR
You don't need to buy a robot to get programming a robot, now there are a range of free and relatively simple to start with robot simula...
Easy, Free and no markers Augmented Reality - location based AR
For a few years, I have been a fan of Aframe and AR.js - these are fantastic tools for creating web-based Virtual and Augmented Reality. No...
Coral Dev Board and Raspberry Pi
This is the second of a planned occasional series of posts on playing with some of the current AI specific add-on processors for Intenet of ...
Explaining the Tinkercad microbit Neural network
In a previous post, I looked at developing a neural network in Tinkercad around the Microbit (details available here ) and the whole model ...
VR robot in a maze - from Blocks to Python
Recently I produced a post about playing with Vex Robotics VexCode VR blocks and the Maze Playground. The post finished with me saying I w...
4tronix Eggbit - cute and wearable - hug avoider
/ The ever-brilliant 4tronix have produced Eggbit https://shop.4tronix.co.uk/collections/microbit-accessories/products/eggbit; a cute, wear...
Showing posts with label 4tronix. Show all posts
Showing posts with label 4tronix. Show all posts
Friday 31 December 2021
Top 10 viewed posts 2021 on the Robot and Physical Computing Blog
Sunday 26 December 2021
Hug Avoider 4 - micropython, Eggbot and speech
The last of the posts on the Hug avoider and the 4Tronix's Eggbit
4Tronix's Eggbit (in fact I bought three of them https://shop.4tronix.co.uk/collections/bbc-micro-bit/products/eggbit-three-pack-special :-) recently) is a cute add-on for the microbit. In three previous posts I looked at eggbit using microcode to produce a hug avoider - warns when people at too close.

In this post using the buttons and adding (via Microbit V2 with its speaker) simple speech
1. Buttons
Pins for the buttons
- pin8 - Green button
- pin12 - Red button
- pin14 - Yellow button
- pin`6 - Blue button
if pin12.read_digital()==1:
#Red Button
blank_it()
if pin8.read_digital()==1:
#Green button
startingMessage()
if pin14.read_digital()==1:
#Yellow button
rainbow()
if pin16.read_digital()==1:
#Blue botton
display.show(Image.ASLEEP)
2. Speech
The basis on the code is take from https://microbit-micropython.readthedocs.io/en/latest/tutorials/speech.html
mess1 = [
"This is the hug avoide",
"please keep back",
]
# Take from https://microbit-micropython.readthedocs.io/en/latest/tutorials/speech.html
for line in mess1:
speech.say(line, speed=120, pitch=100, throat=100, mouth=200)
sleep(500
The speech is difficult to hear but is fun and there are possibly ways to improve this starting with the information on https://microbit-micropython.readthedocs.io/en/latest/tutorials/speech.html
3. Overall
from microbit import *
from machine import time_pulse_us
import neopixel, speech
sonar =pin15
sonar.write_digital(0)
fireled=neopixel.NeoPixel(pin13,9)
def rainbow():
fireled[0] = (255, 0, 40)
fireled[1]= (255,165,0)
#block=yellow
fireled[2] = (255,255,0)
#block=green
fireled[3] = (0,255,0)
#block=blue
fireled [4] = (0,0,255)
# block=indigo
fireled[5] = (75,0,130)
# block=violet
fireled[6] = (138,43,178)
#block=purple
fireled[7] = (255,0,255)
fireled.show()
def blank_it():
for j in range(8):
fireled[j] = (63, 0, 0)
fireled.show()
def howfar():
sonar.write_digital(1)
sonar.write_digital(0)
timeus=time_pulse_us(sonar,1)
echo=timeus/1000000
dist=(echo/2)*34300
sleep(100)
return dist
def startingMessage():
mess1 = [
"This is the hug avoide",
"please keep back",
]
# Take from https://microbit-micropython.readthedocs.io/en/latest/tutorials/speech.html
for line in mess1:
speech.say(line, speed=120, pitch=100, throat=100, mouth=200)
sleep(500)
def buttonplay():
if pin12.read_digital()==1:
#Red Button
blank_it()
if pin8.read_digital()==1:
#Green button
startingMessage()
if pin14.read_digital()==1:
#Yellow button
rainbow()
if pin16.read_digital()==1:
#Blue botton
display.show(Image.ASLEEP)
while True:
buttonplay()
dist=howfar()
if dist>30:
pin2.write_digital(1)
pin0.write_digital(0)
display.show(Image.HAPPY)
else:
pin2.write_digital(1)
pin0.write_digital(1)
blank_it()
speech.say("back away please", speed=120, pitch=100, throat=100, mouth=200)
display.show(Image.ANGRY)
Thursday 23 December 2021
Hug Avoider 3 - experiments with Python and 4Tronix Eggbit

4Tronix's Eggbit (in fact I bought three of them https://shop.4tronix.co.uk/collections/bbc-micro-bit/products/eggbit-three-pack-special :-) recently) is a cute add-on for the microbit (see above). In two previous posts I looked at eggbit using microcode to produce a hug avoider - warns when people at too close.
This post replicates some of this, but this time using Python and shows the stages of the build
- Get the ultrasound to find the distance;
- Produce smile and surprise on the eggbit's 'mouth';
- Produce rainbow on the neopixels or all the pixels turning red;
- Bring it all together so if the person is too close, less than 30cm it reacts.
1. Ultrasonic detection
Probably the most challenging bit of this was getting the ultrasonic distance measrement working. It actually is not that difficult; especially using code from https://firialabs.com/blogs/lab-notes/ultrasonic-distance-sensor-with-python-and-the-micro-bit as the basis of the solution and pin15 does both triggering and receiving. Code sends a pulse out, picked up and processed to get the distance from the delay. The code is shown below:
from microbit import *
from machine import time_pulse_us
sonar =pin15
sonar.write_digital(0)
while True:
sonar.write_digital(1)
sonar.write_digital(0)
timeus=time_pulse_us(sonar,1)
echo=timeus/1000000
dist=(echo/2)*34300
sleep(100)
display.scroll(str(dist))
2. LEDs
To get a greater understanding of how 4Tronix's makecode extension (used in the previou posts) for the Eggbit controls the various pins the best resource was to reverse engineering the code from https://github.com/4tronix/EggBit/blob/main/eggbit.ts in their github respository for the Eggbit.
This gave the colours and the correct pin for the LEDs the code is shown below. Producing a rainbow method and a method to set the LEDs/neopixels to red.
import neopixel
fireled=neopixel.NeoPixel(pin13,9)
def rainbow():
fireled[0] = (255, 0, 40)
fireled[1]= (255,165,0)
#block=yellow
fireled[2] = (255,255,0)
#block=green
fireled[3] = (0,255,0)
#block=blue
fireled [4] = (0,0,255)
# block=indigo
fireled[5] = (75,0,130)
# block=violet
fireled[6] = (138,43,178)
#block=purple
fireled[7] = (255,0,255)
fireled.show()
def blank_it():
for j in range(8):
fireled[j] = (63, 0, 0)
fireled.show()
3. 'Face'
Eggbit has set of LEDs that represent a mouth, controlled via three pins. Only two of those are used in this example
'Smile' is pin2.write_digital(1) the 'lower' part of the mouth and turn off upper part of the mouth pin0.write_digital(0)
'Surprise' uses both parts
pin2.write_digital(1)
pin0.write_digital(1)
4. Overall
So putting this altogether
from microbit import *
from machine import time_pulse_us
import neopixel
sonar =pin15
sonar.write_digital(0)
fireled=neopixel.NeoPixel(pin13,9)
def rainbow():
fireled[0] = (255, 0, 40)
fireled[1]= (255,165,0)
#block=yellow
fireled[2] = (255,255,0)
#block=green
fireled[3] = (0,255,0)
#block=blue
fireled [4] = (0,0,255)
# block=indigo
fireled[5] = (75,0,130)
# block=violet
fireled[6] = (138,43,178)
#block=purple
fireled[7] = (255,0,255)
fireled.show()
def blank_it():
for j in range(8):
fireled[j] = (63, 0, 0)
fireled.show()
def howfar():
sonar.write_digital(1)
sonar.write_digital(0)
timeus=time_pulse_us(sonar,1)
echo=timeus/1000000
dist=(echo/2)*34300
sleep(100)
return dist
while True:
dist=howfar()
if dist>30:
pin2.write_digital(1)
pin0.write_digital(0)
rainbow()
display.show(Image.HAPPY)
else:
pin2.write_digital(1)
pin0.write_digital(1)
blank_it()
display.show(Image.ANGRY)
Saturday 12 June 2021
4tronix Eggbit - cute and wearable - hug avoider
/

The ever-brilliant 4tronix have produced Eggbit https://shop.4tronix.co.uk/collections/microbit-accessories/products/eggbit; a cute, wearable device, with ultrasonic sensors, buttons and LEDs for the microbit - I couldn't resist.
Programming is through Makecode and an extension is available, to download and install. To use the extension, at the time of writing this, go through the add extension option and use the search box to add it from https://github.com/4tronix/EggBit

So what to do with it? Inspired by social distancing (or not being a 'hugger') created it so that when people get too close the RGB LEDs go out - simple but fun. The distance is set at 20cm for testing. The code is shown below.

It was fun to do and perhaps swapping the settings around so the lights come on when people at too close might be more fun or using sound. This is a lovely device to play with and the look encourages play - just look how cute it is! The price is reasonable and the look means it has the potential to encourage a wide range of people to experiment with it.
Tuesday 23 April 2019
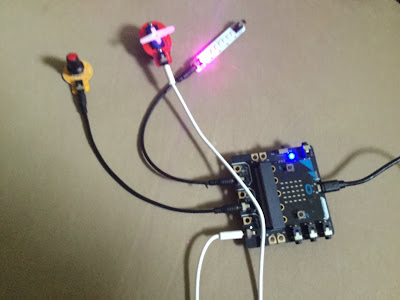
Combining Beta Edublocks and Microbit Playground
I have recently been playing with Edublocks (edublocks.org) and the 4tronix's Microbit Playground (the appropriately named Super Kit) controlling programmable pixels/neopixels and a servo.

Recently a beta version of the Edublocks (see above) has become available (https://app.edublocks.org/) so I wanted to play with it a bit and, at the same time, combine control the servo motor and neopixels together via a potentiometer (see below).
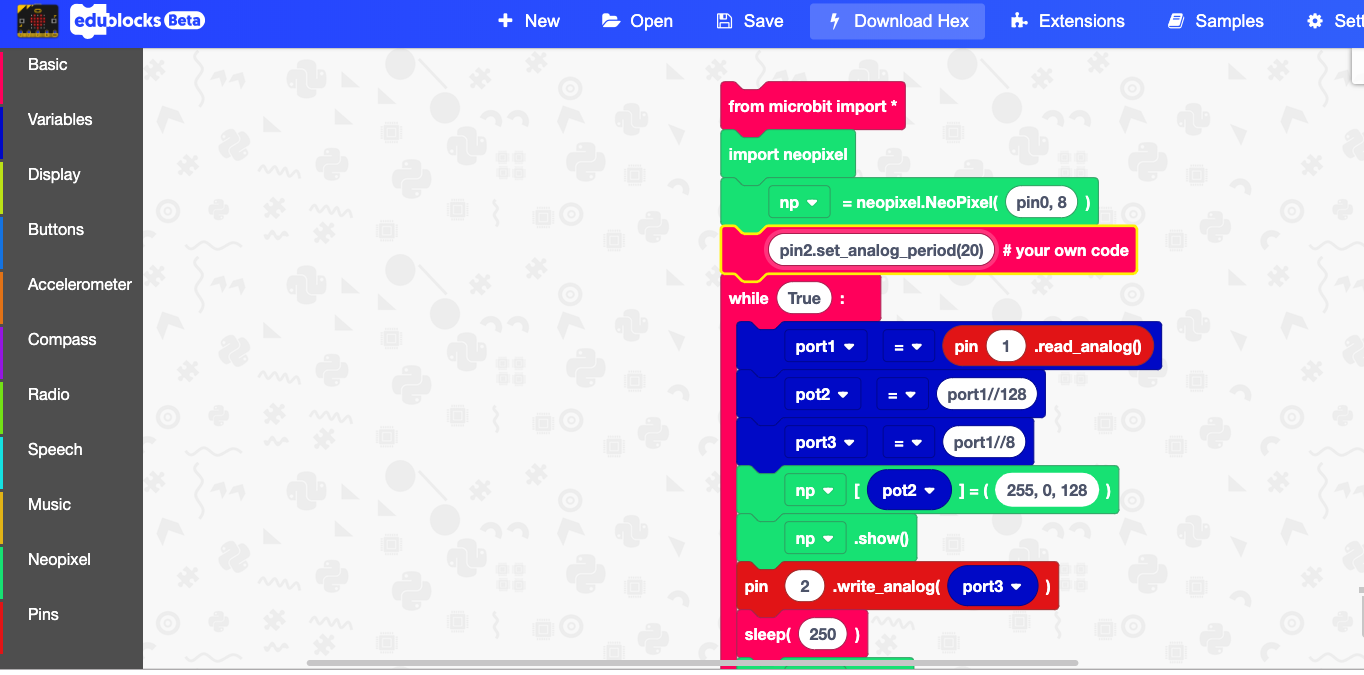
The block version of the code is shown below:
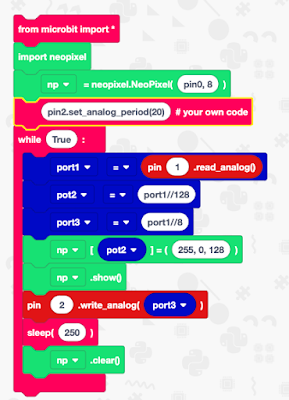
The python version
np = None
port1 = None
pot2 = None
port3 = None
from microbit import *
import neopixel
np = neopixel.NeoPixel(pin0, 8)
pin2.set_analog_period(20)# your own code
while True:
port1 = pin1.read_analog()
pot2 = port1//128
port3 = port1//8
np[pot2] = (255, 0, 128)
np.show()
pin2.write_analog(port3)
sleep(250)
np.clear()
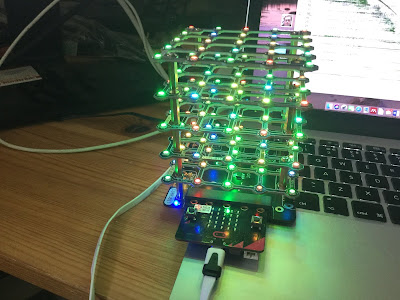
To see it action
via GIPHY
A few thoughts on the beta version, I actually like it more than the current version for doing this kind of activity. I found it clearer to use, it was easier to know what was needed to be done with blocks around the neopixels than the previous version, which needed a little more thought.
All opinions in this blog are the Author's and should not in any way be seen as reflecting the views of any organisation the Author has any association with. Twitter @scottturneruon
Recently a beta version of the Edublocks (see above) has become available (https://app.edublocks.org/) so I wanted to play with it a bit and, at the same time, combine control the servo motor and neopixels together via a potentiometer (see below).

The block version of the code is shown below:

The python version
np = None
port1 = None
pot2 = None
port3 = None
from microbit import *
import neopixel
np = neopixel.NeoPixel(pin0, 8)
pin2.set_analog_period(20)# your own code
while True:
port1 = pin1.read_analog()
pot2 = port1//128
port3 = port1//8
np[pot2] = (255, 0, 128)
np.show()
pin2.write_analog(port3)
sleep(250)
np.clear()
To see it action
A few thoughts on the beta version, I actually like it more than the current version for doing this kind of activity. I found it clearer to use, it was easier to know what was needed to be done with blocks around the neopixels than the previous version, which needed a little more thought.
All opinions in this blog are the Author's and should not in any way be seen as reflecting the views of any organisation the Author has any association with. Twitter @scottturneruon
Saturday 1 September 2018
Build a Disco cube:bit that reacts to music.
In a previous post Micro:bit and Cube:bit 'says' Hello I introduced the start of me playing with the 4tronix Cube:bit. One of the things I want to try is get the cube to react to music, based around the accelerometers in a micro:bit picking up vibrations. Luckily, in an earlier post, I had done something similar for the Proto-Pic Micro:pixel (see Dancing Pixels for more details).
Essentially the idea is the vibrations from the music shake the micro:bit enough to give measurable changes in three axis, and these values are used to change the pixel's colour - in fact five pixels at a time.
The code shown below is all that was needed:
from microbit import *
import neopixel, random
np = neopixel.NeoPixel(pin0, 125)
while True:
for pxl in range (2,125, 5):
rd=int(abs(accelerometer.get_x())/20)
gr=int(abs(accelerometer.get_y())/20)
bl=int(abs(accelerometer.get_z())/20)
np[pxl] = (rd, gr, 0)
np[pxl-1] = (rd, gr, 0)
np[pxl+1] = (0, gr, rd)
np[pxl-2] = (rd, 0, 0)
np[pxl+2] = (0, gr,0)
np.show()
Here it is in action:
The music used in the video is
Please feel free to improve on this.
All opinions in this blog are the Author's and should not in any way be seen as reflecting the views of any organisation the Author has any association with. Twitter @scottturneruon
Microbit and Cube:bit 'says' Hello
Since seeing pictures of the 4tronix Cube:bit I have intrigued by it and now I have one. So what is it? It is a 3D array of neopixel-style LEDs, or another way of describing it a programmable box of LEDs (or just good fun). The option I went for the 5x5x5 array (125 LEDs) controlling it with a micro:bit, and the base for mounting and powering the grid.
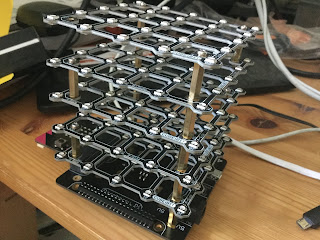
Instructions for putting it together can be found at https://4tronix.co.uk/blog/?p=1770. My main bit of advice is read the instructions carefully especially if you go for the 5x5 options, at the time of writing, you need to move a standoff around but it is all in the instructions. Admittedly I missed this step initially.
So to playtime, using a microbit I wanted to spell-out HELLO across the grid using the Micro:Bit JavaScript Blocks/MakeCode Editor. Basically, my solution revolved around creating two JavaScript functions to produce vertical and horizontal patterns on the grid (sounds good saying that - reminds me of Tron). What is very useful is 4tronix's have provided their own MakeCode package (the URL needed is in the instructions https://4tronix.co.uk/blog/?p=1770 ), this was great it made it even easier to get programming. The plan was put H is one first vertical plane, the E on the next and so on.
The code to my solution is available here https://makecode.microbit.org/_ePhFgu13i97D or can be seen or download from below.
The video below shows it in action.
It isn't the cheapest option for producing a grid of neopixel-style LEDs but it probably one of the easiest ways to do this. Quite quickly (if you read the instructions) you have a 3D array of LEDs to program. Last but not least, it is fun. Now I have to think (or rather stop thinking) about all the things I want to do with this.
Another review and related links:
All opinions in this blog are the Author's and should not in any way be seen as reflecting the views of any organisation the Author has any association with. Twitter @scottturneruon

Instructions for putting it together can be found at https://4tronix.co.uk/blog/?p=1770. My main bit of advice is read the instructions carefully especially if you go for the 5x5 options, at the time of writing, you need to move a standoff around but it is all in the instructions. Admittedly I missed this step initially.
So to playtime, using a microbit I wanted to spell-out HELLO across the grid using the Micro:Bit JavaScript Blocks/MakeCode Editor. Basically, my solution revolved around creating two JavaScript functions to produce vertical and horizontal patterns on the grid (sounds good saying that - reminds me of Tron). What is very useful is 4tronix's have provided their own MakeCode package (the URL needed is in the instructions https://4tronix.co.uk/blog/?p=1770 ), this was great it made it even easier to get programming. The plan was put H is one first vertical plane, the E on the next and so on.
The code to my solution is available here https://makecode.microbit.org/_ePhFgu13i97D or can be seen or download from below.
The video below shows it in action.
It isn't the cheapest option for producing a grid of neopixel-style LEDs but it probably one of the easiest ways to do this. Quite quickly (if you read the instructions) you have a 3D array of LEDs to program. Last but not least, it is fun. Now I have to think (or rather stop thinking) about all the things I want to do with this.
Another review and related links:
- Review https://www.electromaker.io/blog/article/building-a-cube-with-cubebit
- Lorraine Underwood's Cubert https://hackspace.raspberrypi.org/features/cubert-when-an-led-grid-wont-cut-it-take-the-blinkenlights-to-another
All opinions in this blog are the Author's and should not in any way be seen as reflecting the views of any organisation the Author has any association with. Twitter @scottturneruon
Thursday 24 August 2017
Robot control by a neuron.
This year the Computing team has been fortunate enough to host three Nuffield Research Placement students (https://www.nuffieldresearchplacements.org/) all working with Dr Scott Turner.
Example of the code.
import serial
from math import fabs
import random
import sys
import glob
#TO DO: GUI, implement manual mode. Make manual mode a button?? When in automatic, weight boxes are greyed out. Otherwise, they are able to be typed into.
def forward(n):
microbit.write(('f'+str(n)).encode('utf-8'))
def backward(n):
microbit.write(('b'+str(n)).encode('utf-8'))
def turnR(n):
microbit.write(('r'+str(n)).encode('utf-8'))
def turnL(n):
microbit.write(('l'+str(n)).encode('utf-8'))
def end():
microbit.write('e'.encode('utf-8'))
def serial_ports():
""" Lists serial port names
:raises EnvironmentError:
On unsupported or unknown platforms
:returns:
A list of the serial ports available on the system
"""
if sys.platform.startswith('win'):
ports = ['COM%s' % (i + 1) for i in range(256)]
elif sys.platform.startswith('linux') or sys.platform.startswith('cygwin'):
# this excludes your current terminal "/dev/tty"
ports = glob.glob('/dev/tty[A-Za-z]*')
elif sys.platform.startswith('darwin'):
ports = glob.glob('/dev/cu.*')
else:
raise EnvironmentError('Unsupported platform')
result = []
for port in ports:
try:
s = serial.Serial(port)
s.close()
if '/dev/cu' in port:
if '/dev/cu.usbmodem' in port:
result.append(port)
else:
result.append(port)
except (OSError, serial.SerialException):
pass
return result
class neuron:
def __init__(self,ins):
self.inputs = [1]
self.weights = []
for i in range(ins+1):
self.weights.append(random.uniform(-1,1))
#print(self.weights)
self.LC = 0.005
def get_output(self,inputs):
self.inputs = [1]+inputs
WSum = 0
for i in range(len(self.inputs)):
WSum += int(self.inputs[i]) * self.weights[i]
sums = sorted([fabs(WSum), fabs(WSum - (1/3)), fabs(WSum-(2/3)), fabs(WSum-1)])
#print(sums)
if sums[0] == fabs(WSum): #return 0 - move backwards
backward(5)
return 'B',WSum
elif sums[0] == fabs(WSum - (1/3)):
turnR(5)
return 'R', WSum
elif sums[0] == fabs(WSum - (2/3)):
turnL(5)
return 'L', WSum
else:
forward(20)
return 'F', WSum
def train(self,inputs,desired):
result = self.get_output(inputs)[1]
print(result)
error = desired - result
#print(error)
for w in range(len(self.weights)):
change = self.LC * int(self.inputs[w]) * error
print('change in weight ' + str(w) + ': ' + str(change))
self.weights[w] += change
for i in serial_ports():
try:
microbit = serial.Serial(port=i, baudrate=115200)
break
except:
pass
microbit.setDTR(1)
microbit.close()
microbit.open()
control = neuron(2)
mode = input('Automatic or Manual? (A/M)\n')
while mode.lower() not in ['a','m']:
mode = input('Automatic or Manual? (A/M)\n')
if mode == 'm':
control.weights[0],control.weights[1],control.weights[2] = int(input('Enter weight 0/bias: ')),int(input('Enter weight 1: ')), int(input('Enter weight 2: '))
while True:
#microbit.write(input('input: ').encode('utf-8'))
out = microbit.read(6)
microbit.flush()
try:
out = out.decode()
except:
pass
for i in range(len(out)):
if str(out[i]) in ['0','1']:
if i == 0:
if out[1] == ']':
num2 = out[i]
elif out[1] == ',':
num1 = out[i]
elif i == 5:
if out[4] == '[':
num1 = out[i]
elif out[4] == ' ':
num2 = out[i]
else:
if out[i-1] == '[':
num1 = out[i]
elif out[i-1] == ' ':
num2 = out[i]
elif out[i+1] == ']':
num2 = out[i]
elif out[i+1] == ',':
num1 = out[i]
#print(out)
try:
sleft=int(num1)
sright=int(num2)
print([sleft, sright])
if mode == 'a':
if [sleft, sright] == [0, 0]:
control.train([sleft,sright],0)
elif [sleft, sright] == [0, 1]:
control.train([sleft,sright], 1/3)
elif [sleft,sright] == [1, 0]:
control.train([sleft,sright], 2/3)
else:
control.train([sleft,sright], 1)
else:
if [sleft, sright] == [0, 0]:
control.get_output([sleft,sright])
elif [sleft, sright] == [0, 1]:
control.get_output([sleft,sright])
elif [sleft,sright] == [1, 0]:
control.get_output([sleft,sright])
else:
control.get_output([sleft,sright])
except:
pass
All opinions in this blog are the Author's and should not in any way be seen as reflecting the views of any organisation the Author has any association with. Twitter @scottturneruon
Michael Welsh
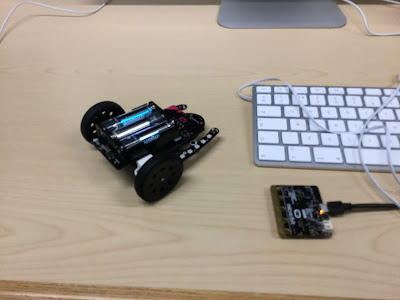
Michael has been working on using a micro:bit based bitbot from 4tronix to produce a potential teaching tool; an example of artificial neurons used control a robot. The aim is for this tool to be used with 3rd-year Undergraduates, as part of a module on Artificial Intelligence.
Michael's solution was to use the computer to run and train a single neuron; then for the robot to send values from the line sensors back to the program running on a Computer and receive control signals.
Sounds easy? No really, in the end, the software running on the computer had to also send and receive the data through a microbit (via USB) and then use radio to communicate with the bit:bot robot. All the various developed parts of the solution were implemented in Python by Michael.

import serial
from math import fabs
import random
import sys
import glob
#TO DO: GUI, implement manual mode. Make manual mode a button?? When in automatic, weight boxes are greyed out. Otherwise, they are able to be typed into.
def forward(n):
microbit.write(('f'+str(n)).encode('utf-8'))
def backward(n):
microbit.write(('b'+str(n)).encode('utf-8'))
def turnR(n):
microbit.write(('r'+str(n)).encode('utf-8'))
def turnL(n):
microbit.write(('l'+str(n)).encode('utf-8'))
def end():
microbit.write('e'.encode('utf-8'))
def serial_ports():
""" Lists serial port names
:raises EnvironmentError:
On unsupported or unknown platforms
:returns:
A list of the serial ports available on the system
"""
if sys.platform.startswith('win'):
ports = ['COM%s' % (i + 1) for i in range(256)]
elif sys.platform.startswith('linux') or sys.platform.startswith('cygwin'):
# this excludes your current terminal "/dev/tty"
ports = glob.glob('/dev/tty[A-Za-z]*')
elif sys.platform.startswith('darwin'):
ports = glob.glob('/dev/cu.*')
else:
raise EnvironmentError('Unsupported platform')
result = []
for port in ports:
try:
s = serial.Serial(port)
s.close()
if '/dev/cu' in port:
if '/dev/cu.usbmodem' in port:
result.append(port)
else:
result.append(port)
except (OSError, serial.SerialException):
pass
return result
class neuron:
def __init__(self,ins):
self.inputs = [1]
self.weights = []
for i in range(ins+1):
self.weights.append(random.uniform(-1,1))
#print(self.weights)
self.LC = 0.005
def get_output(self,inputs):
self.inputs = [1]+inputs
WSum = 0
for i in range(len(self.inputs)):
WSum += int(self.inputs[i]) * self.weights[i]
sums = sorted([fabs(WSum), fabs(WSum - (1/3)), fabs(WSum-(2/3)), fabs(WSum-1)])
#print(sums)
if sums[0] == fabs(WSum): #return 0 - move backwards
backward(5)
return 'B',WSum
elif sums[0] == fabs(WSum - (1/3)):
turnR(5)
return 'R', WSum
elif sums[0] == fabs(WSum - (2/3)):
turnL(5)
return 'L', WSum
else:
forward(20)
return 'F', WSum
def train(self,inputs,desired):
result = self.get_output(inputs)[1]
print(result)
error = desired - result
#print(error)
for w in range(len(self.weights)):
change = self.LC * int(self.inputs[w]) * error
print('change in weight ' + str(w) + ': ' + str(change))
self.weights[w] += change
for i in serial_ports():
try:
microbit = serial.Serial(port=i, baudrate=115200)
break
except:
pass
microbit.setDTR(1)
microbit.close()
microbit.open()
control = neuron(2)
mode = input('Automatic or Manual? (A/M)\n')
while mode.lower() not in ['a','m']:
mode = input('Automatic or Manual? (A/M)\n')
if mode == 'm':
control.weights[0],control.weights[1],control.weights[2] = int(input('Enter weight 0/bias: ')),int(input('Enter weight 1: ')), int(input('Enter weight 2: '))
while True:
#microbit.write(input('input: ').encode('utf-8'))
out = microbit.read(6)
microbit.flush()
try:
out = out.decode()
except:
pass
for i in range(len(out)):
if str(out[i]) in ['0','1']:
if i == 0:
if out[1] == ']':
num2 = out[i]
elif out[1] == ',':
num1 = out[i]
elif i == 5:
if out[4] == '[':
num1 = out[i]
elif out[4] == ' ':
num2 = out[i]
else:
if out[i-1] == '[':
num1 = out[i]
elif out[i-1] == ' ':
num2 = out[i]
elif out[i+1] == ']':
num2 = out[i]
elif out[i+1] == ',':
num1 = out[i]
#print(out)
try:
sleft=int(num1)
sright=int(num2)
print([sleft, sright])
if mode == 'a':
if [sleft, sright] == [0, 0]:
control.train([sleft,sright],0)
elif [sleft, sright] == [0, 1]:
control.train([sleft,sright], 1/3)
elif [sleft,sright] == [1, 0]:
control.train([sleft,sright], 2/3)
else:
control.train([sleft,sright], 1)
else:
if [sleft, sright] == [0, 0]:
control.get_output([sleft,sright])
elif [sleft, sright] == [0, 1]:
control.get_output([sleft,sright])
elif [sleft,sright] == [1, 0]:
control.get_output([sleft,sright])
else:
control.get_output([sleft,sright])
except:
pass
All opinions in this blog are the Author's and should not in any way be seen as reflecting the views of any organisation the Author has any association with. Twitter @scottturneruon
Friday 30 December 2016
Neuron Controlled Edge follower updated
In the last post experimentation with an artificial neuron controlling the Bit:Bot to follow the edge of a line (it follows the left-hand side of the line).
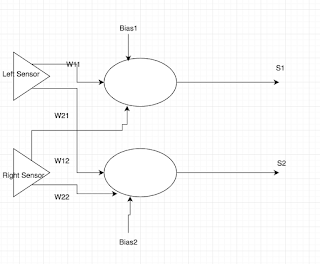
More details can be found in the previous post.The neurons (well two separate ones, S1 and S2) are produced using weighted sums - summing the weights x inputs [ right-hand sensor (rs) and left-hand sensor (ls)] plus a bias for each neuron in this case w[0] and w[3].
net=w[0]+w[1]*rs+w[2]*ls
net2=w[3]+w[4]*rs+w[5]*ls
If weighted sum >=0 then its output 1 otherwise 0
What actual causes S1 to be either 1 or 0 is all defined by a set of weights w (three for the first neurone, S1, three for S2).
w=[0,-1,1,-1,1,-1]
Modifications to the code in the last post have been around fine tuning the values in converting the outputs of the two neurons S1 and S2 into actions as shown below.
if s1==1 and s2==1:
forward(20)
elif s1==0 and s2==1:
forward(15)
right_turn(25)
elif s1==1 and s2==0:
forward(15)
left_turn(25)
elif s1==0 and s2==0:
backward(5)
The functions for forward, right_turn, etc are defined elsewhere.
To change the function of the system, change the values in wThe complete code is shown below.
Code
from microbit import *
import neopixel, random, array
w=[]
def forward(n):
pin0.write_analog(551)
pin8.write_digital(0)
pin1.write_analog(551)
pin12.write_digital(0)
sleep(n)
def backward(n):
pin0.write_analog(551)
pin8.write_digital(1)
pin1.write_analog(551)
pin12.write_digital(1)
sleep(n)
def right_turn(n):
pin0.write_analog(511)
pin8.write_digital(0)
pin1.write_analog(511)
pin12.write_digital(1)
sleep(n)
def left_turn(n):
pin0.write_analog(551)
pin8.write_digital(1)
pin1.write_analog(551)
pin12.write_digital(0)
sleep(n)
w=[0,-1,1,-1,1,-1]
while True:
ls= pin11.read_digital()
rs= pin5.read_digital()
net=w[0]+w[1]*rs+w[2]*ls
net2=w[3]+w[4]*rs+w[5]*ls
if net>=0:
s1=1
else:
s1=0
if net2>=0:
s2=1
else:
s2=0
if s1==1 and s2==1:
forward(20)
elif s1==0 and s2==1:
forward(15)
right_turn(25)
elif s1==1 and s2==0:
forward(15)
left_turn(25)
elif s1==0 and s2==0:
backward(5)
Video of it in action:
Please feel free to use the code and improve on it, and I would especially welcome the seeing the improvement through the comments.
All opinions in this blog are the Author's and should not in any way be seen as reflecting the views of any organisation the Author has any association with. Twitter @scottturneruon
Subscribe to:
Posts (Atom)
Top posts on this blog in March 2024
The Top 10 viewed post on this blog in March 2024. Covering areas such as small robots, augmented reality, Scratch programming, robots. Micr...