Speech Recognition in Scratch 3 - turning Hello into Bonjour!
The Raspberry Pi Foundation recently released a programming activity Alien Language , with support Dale from Machine Learning for Kids , tha...
PS3 Controller to move a USB Robot Arm
Guest Blogger Hiren Mistry, Nuffield Research Placement Student working at the University of Northampton. How to use a PS3 Controller to...
Scratch Robot Arm
It is not physical but CBiS Education have release a free robot arm simulator for Scratch. Downloadable from their site http://w...
Tinkercad and Microbit: To make a neuron
The free online CAD (and so much more) package Tinkercad https://www.tinkercad.com/ under circuits; now has microbits as part of the list ...
Escape the Maze with a VR robot - Vex VR
You don't need to buy a robot to get programming a robot, now there are a range of free and relatively simple to start with robot simula...
Easy, Free and no markers Augmented Reality - location based AR
For a few years, I have been a fan of Aframe and AR.js - these are fantastic tools for creating web-based Virtual and Augmented Reality. No...
Coral Dev Board and Raspberry Pi
This is the second of a planned occasional series of posts on playing with some of the current AI specific add-on processors for Intenet of ...
Explaining the Tinkercad microbit Neural network
In a previous post, I looked at developing a neural network in Tinkercad around the Microbit (details available here ) and the whole model ...
VR robot in a maze - from Blocks to Python
Recently I produced a post about playing with Vex Robotics VexCode VR blocks and the Maze Playground. The post finished with me saying I w...
4tronix Eggbit - cute and wearable - hug avoider
/ The ever-brilliant 4tronix have produced Eggbit https://shop.4tronix.co.uk/collections/microbit-accessories/products/eggbit; a cute, wear...
Showing posts with label blocks. Show all posts
Showing posts with label blocks. Show all posts
Friday 31 December 2021
Top 10 viewed posts 2021 on the Robot and Physical Computing Blog
Sunday 21 February 2021
Escape the Maze with a VR robot - Vex VR
You don't need to buy a robot to get programming a robot, now there are a range of free and relatively simple to start with robot simulators to play with. Three examples are listed below:
- Make code for Lego EV3 https://robotsandphysicalcomputing.blogspot.com/2020/05/programming-robots-virtually-3-lego-ev3.html
- iRobot simulator https://robotsandphysicalcomputing.blogspot.com/2020/04/programming-robots-virtually-2-irobot.html
- Vex robotics Vexcode VR https://robotsandphysicalcomputing.blogspot.com/2020/04/programming-robots-virtually-1-vexcode.html
It is the last one of these (https://www.vexrobotics.com/vexcode-vr) that is the focus of this post and return to hit, after an earlier discussion in https://robotsandphysicalcomputing.blogspot.com/2020/04/programming-robots-virtually-1-vexcode.html .
Two of the nice things about the package, apart from being free, are it uses a Scratch-like programming language and it provides a 3D environment and models - playgrounds for a number of scenarios.
So in this post, I will be discussing playing, or rather starting to play with the robot navigating a 3D maze (see the figure above). A feature I particularly like is you can change the views from an overhead view to an onboard version or one that seems to follow the robot.


So as I starting point I programmed it to essentially bounce along the walls keeping the wall on it's right and stopping when the downward 'eye' detects red on the floor for the end of the maze. The sensors include left and right bumper sensors; along with two sensors for detecting colours one facing forward and one down. The code I use is shown below:

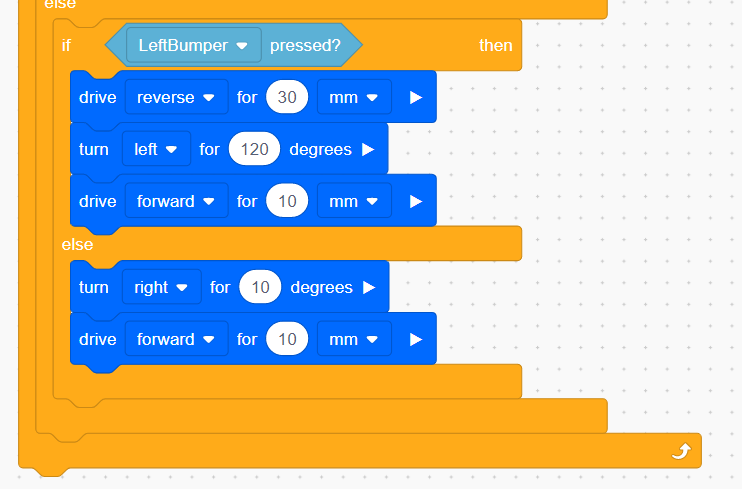
It took 8 minutes to solve the maze - which is slow. I would be interested to see the solutions of others being shared. As a simulated robot programming system this is great fun and challenging, I would recommend having a play iot is free and available at https://www.vexrobotics.com/vexcode-vr. I want to have a go with the Python version to replicate or better the solution above (start it as a text project rather than a blocks project when starting a new project).

Saturday 18 July 2020
Speech Recognition in Scratch 3 - turning Hello into Bonjour!
The Raspberry Pi Foundation recently released a programming activity Alien Language, with support Dale from Machine Learning for Kids, that is a brilliant use of Scratch 3 - Speech Recognition to control a sprite in an alien language. Do the activity, and it is very much worth doing, and it will make sense! I would also recommend going to the machinelearningforkids.co.uk site anyway it is full of exciting things to do (for example loads of activities https://machinelearningforkids.co.uk/#!/worksheets ). Scratch 3 has lots of extensions that are accessible through the Extension button in the Scratch 3 editor (see below) which add new fun new blocks to play with.

The critical thing for this post is Machine Learning for Kids have created a Scratch 3 template with their own extensions for Scratch 3 within it https://machinelearningforkids.co.uk/scratch3/. One of which is a Speech to Text extension (see below). You must use this one not the standard Scratch 3.

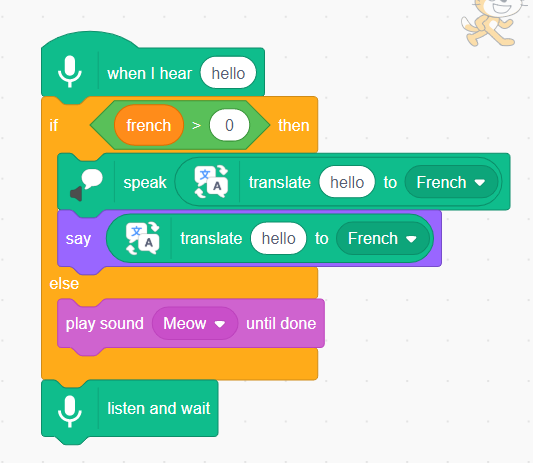
My idea is to can I set it to react one way when I say "hello"; then say "french" and then say "hello" it says "Bonjour". Two other extensions are needed along with the Speech to Text one - one for speech to text and the translate shown below.
Ok, so to the fun bit. The listen and wait, and when I hear blocks are the key new blocks, and they do what they say. The three sets of the code are ones I used for this activity.


Thank you to Machine Learning for Kids for creating such a brilliant Scratch extension - this is well worth a play with.
Thursday 10 May 2018
MSc meets Micro:Bit
I have recently been teaching a module on Internet Programming on a MSc Computing programme (see related links), and was looking for a way to introduce a little bit of physical computing to finish of the module - micro:bits offer a route.
So a bit of context; most of the students on the module had first degrees in either networking or software engineering; so before they start the module they are competent in programming with Javascript, HTML, CSS and PHP. Therefore the module looked to develop new areas such as introductory blockchain, virtual reality via the web (e.g. WebVR), using social media sources; but lastly looking at physical computing leading to an insight into the Internet of Things (IoT). As part of this last topic gaining some experience of programming and very simple networking was looked at using the micro:bit.
An activity was produced where:
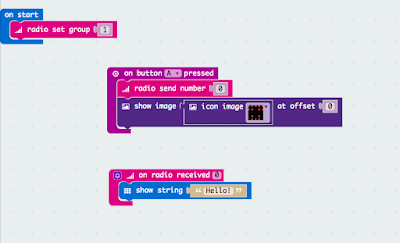
Initially, javascript blocks (as above) were used and some students stuck with the graphical blocks, others moved into the text-based version. As far as the activity went it didn't matter; the main goals were to see the programming of a physical device via a web interface; to break a little mystique that it is as ways much harder to program physical devices and to get a bit of very simple networking going on.
Many of the students, started to investigate getting sounds to play on headphones and getting one micro:bit to trigger the other to play. One group went and started playing with python.
Reflection bit - If I had similar, competent group again I would start this earlier; the level of engagement seemed high and the activities could then start developing towards IoT. Though, I admit to a bias for physical computing, it is appropriate in HE teaching; even using tools primarily designed for schools like the micro:bit.
Related Links
MSc Computing
MSc Computing (Computer Network Engineering)
MSc Computing (Software Engineering)
All opinions in this blog are the Author's and should not in any way be seen as reflecting the views of any organisation the Author has any association with. Twitter @scottturneruon
So a bit of context; most of the students on the module had first degrees in either networking or software engineering; so before they start the module they are competent in programming with Javascript, HTML, CSS and PHP. Therefore the module looked to develop new areas such as introductory blockchain, virtual reality via the web (e.g. WebVR), using social media sources; but lastly looking at physical computing leading to an insight into the Internet of Things (IoT). As part of this last topic gaining some experience of programming and very simple networking was looked at using the micro:bit.
An activity was produced where:
- they, in pairs, initially replicate some code and work out how it worked;
- they then took the code and experimented with their own ideas.
In all cases they had to produce something that allowed doing something on one micro:bit, caused another micro:bit to do something in response.

Initially, javascript blocks (as above) were used and some students stuck with the graphical blocks, others moved into the text-based version. As far as the activity went it didn't matter; the main goals were to see the programming of a physical device via a web interface; to break a little mystique that it is as ways much harder to program physical devices and to get a bit of very simple networking going on.
Many of the students, started to investigate getting sounds to play on headphones and getting one micro:bit to trigger the other to play. One group went and started playing with python.
Reflection bit - If I had similar, competent group again I would start this earlier; the level of engagement seemed high and the activities could then start developing towards IoT. Though, I admit to a bias for physical computing, it is appropriate in HE teaching; even using tools primarily designed for schools like the micro:bit.
Related Links
MSc Computing
MSc Computing (Computer Network Engineering)
MSc Computing (Software Engineering)
All opinions in this blog are the Author's and should not in any way be seen as reflecting the views of any organisation the Author has any association with. Twitter @scottturneruon
Wednesday 26 July 2017
kitronik :Move mini buggy (JavaScript blocks)
Finally got around to building add playing with the Kitronik :Move https://www.kitronik.co.uk/5624-move-mini-buggy-kit-excl-microbit.html (see below - I decided to put the green sides on the outside - just to be different). One of its features is a vertical set of holes for a pen to be placed in.

Add the blocks (found at https://github.com/KitronikLtd/pxt-kitronik-servo-lite) in blocks editor (https://makecode.microbit.org/) to control the motors. You can do the same thing with writing to the pins, those instructions come with the build instructions, but using the extra blocks is a little easier to understand. Also add the package for neopixels (type in neopixels in the search box to find them). Two very good tutorials I found useful to start with can be found at:

1. Motor example
I wanted it so that press A on the Micro:bit the robot goes turns right, goes forward, goes back and turns left.
A stop block does need to be included, without it the :Move will continue moving. The wheels I found can slip on some surfaces reducing the precision, but still fun to play with.
2. At the start and stopping.
I want to use the motors and the 'pixels', but I want to have a known starting position for the motors and set the turning speed; this was possible using the blocks (see below). The pixels are set at this point on pin P0 (see below) as well.
To stop both the motors and cycling of the pixels - pressing buttons A+B together was set up to this.

4. Summary
This is great fun. Having the set of blocks adding for the servos means it is a bit simpler to work with.
All opinions in this blog are the Author's and should not in any way be seen as reflecting the views of any organisation the Author has any association with. Twitter @scottturneruon

Add the blocks (found at https://github.com/KitronikLtd/pxt-kitronik-servo-lite) in blocks editor (https://makecode.microbit.org/) to control the motors. You can do the same thing with writing to the pins, those instructions come with the build instructions, but using the extra blocks is a little easier to understand. Also add the package for neopixels (type in neopixels in the search box to find them). Two very good tutorials I found useful to start with can be found at:
- Neopixels on the robot in blocks - https://www.kitronik.co.uk/blog/using-kitronik-zip-leds-bbc-microbit/
- Servos on the robot in blocks - https://www.kitronik.co.uk/blog/kitronik-custom-pxt-editor-servo-blocks/


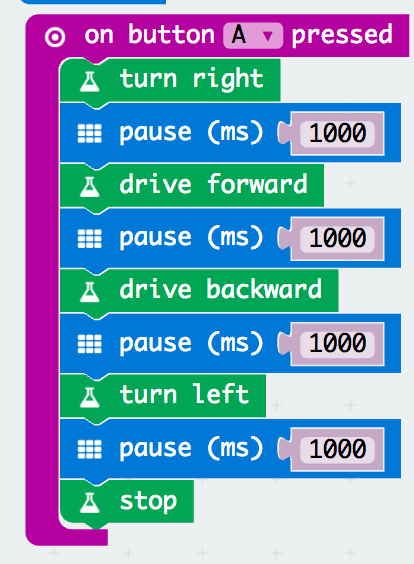
1. Motor example
I wanted it so that press A on the Micro:bit the robot goes turns right, goes forward, goes back and turns left.
A stop block does need to be included, without it the :Move will continue moving. The wheels I found can slip on some surfaces reducing the precision, but still fun to play with.
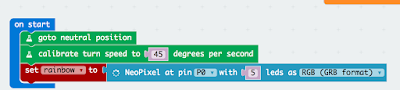
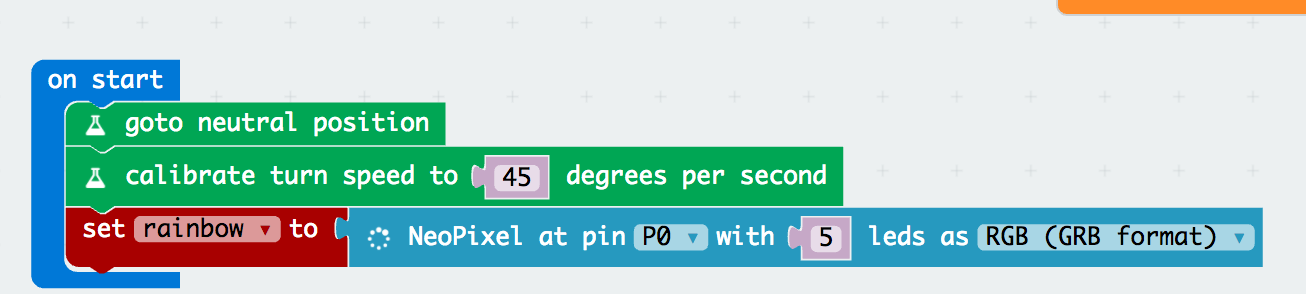
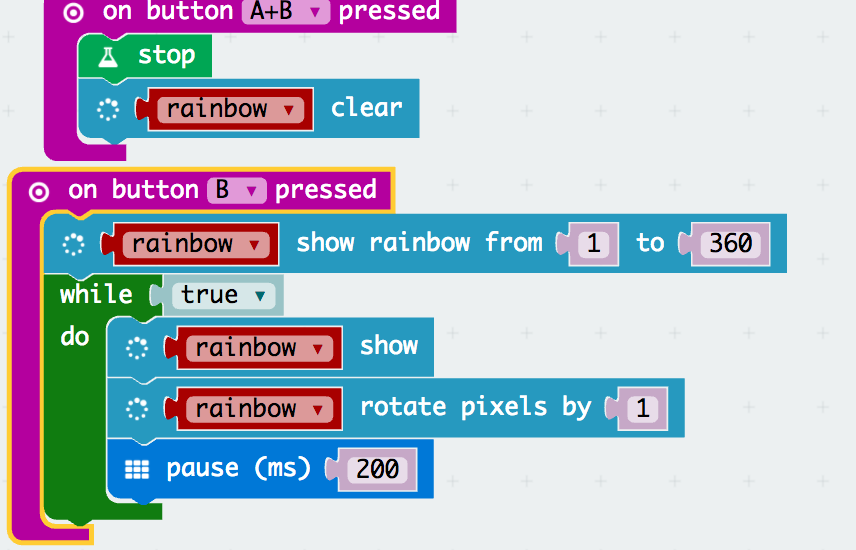
2. At the start and stopping.
I want to use the motors and the 'pixels', but I want to have a known starting position for the motors and set the turning speed; this was possible using the blocks (see below). The pixels are set at this point on pin P0 (see below) as well.
To stop both the motors and cycling of the pixels - pressing buttons A+B together was set up to this.
3. Rainbow on the pixels.
On pressing button B the pixels rotate through a range of colours.
4. Summary
This is great fun. Having the set of blocks adding for the servos means it is a bit simpler to work with.
All opinions in this blog are the Author's and should not in any way be seen as reflecting the views of any organisation the Author has any association with. Twitter @scottturneruon
Friday 30 June 2017
Cozmo is programmable


An example of the code is shown below, getting Cozmo to:
- Start moving around
- Wait until it see a face
- Says Hi Everybody
- Moves forward
- Sounds like a cat
- Looks down and then raises it's forks
- Acts 'grumpy'
- Acts 'happy'

The video at the end shows this in action.
It is an easy to use tool and with a lot of the Cozmo actions available in the blocks, put a few blocks together and very quickly you have Cozmo doing some interesting and often funny actions. Is it very flexible, no; but it is not meant to be - it is meant to be easy to use and it is and great fun. Personally, I felt the app needed this addition, it adds the element to take this toy further into a coding toy (yes another one) that it feels, to me, it should be.
Related posts
Cozmo-Wall-E has a rival
Cozmo is coming to the UK
Android app
iPad app
All opinions in this blog are the Author's and should not in any way be seen as reflecting the views of any organisation the Author has any association with. Twitter @scottturneruon
Saturday 19 November 2016
kamibot
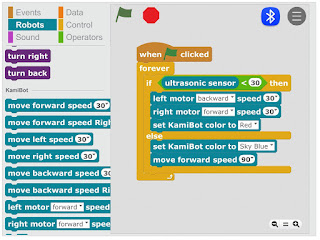
Kamibot was a recent kickstarter (https://www.kickstarter.com/projects/kamibot/kamibot-teach-your-kids-to-code) from the interesting named, Korean company, 3.14 Co., Ltd as a robot you can dress up in paper outfits.

It is actually quite a nice little kit that can be controlled via Android, IOS or PC (available at http://www.kamibot.com/default.php along with some of the plans for paper outfits). The software is a simple Scratch/Blockly style interface and programming is simple. Connecting the robot to the, in my case, an iPad was relatively easy. I would welcome a Mac version of the KamiBlock software but apart from that nice robot kit, that allows you to get programming quickly if you have used Scratch, Blockly or Crumble.
They have recently twitted about new piece of software for Android device - using cards on the screen in combination with their paper mapboard.
All opinions in this blog are the Author's and should not in any way be seen as reflecting the views of any organisation the Author has any association with. Twitter @scottturneruon

It is actually quite a nice little kit that can be controlled via Android, IOS or PC (available at http://www.kamibot.com/default.php along with some of the plans for paper outfits). The software is a simple Scratch/Blockly style interface and programming is simple. Connecting the robot to the, in my case, an iPad was relatively easy. I would welcome a Mac version of the KamiBlock software but apart from that nice robot kit, that allows you to get programming quickly if you have used Scratch, Blockly or Crumble.

They have recently twitted about new piece of software for Android device - using cards on the screen in combination with their paper mapboard.
Kamicard, now available for download to Android users! Who says you need to know how to read to program? https://t.co/SrVZvhMcMF pic.twitter.com/bDv9DeqN4U— KamiBot (@kamibot314) November 17, 2016
All opinions in this blog are the Author's and should not in any way be seen as reflecting the views of any organisation the Author has any association with. Twitter @scottturneruon
Saturday 1 October 2016
Micro:bit, Servo control with Micropython or blocks
You can control servos (small ones) from a Micro:Bit directly. Following a link from the David Whale (Twitter @whaleygeek) , thank you, took me to a Kitronik blog post, https://www.kitronik.co.uk/blog/using-bbc-microbit-control-servo/, which has the answer.
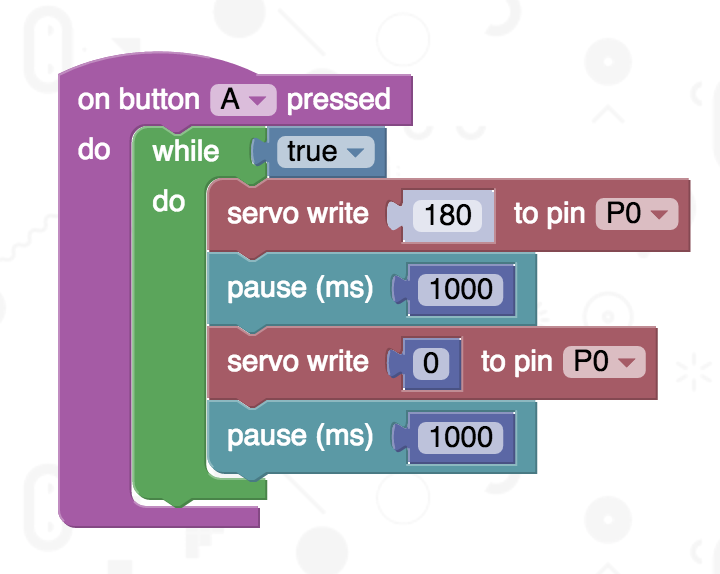
The code uses Microsoft Blocks taken from the post, runs the servos 180 degrees and back again, when button A is pressed. It does exactly what it should. I am also using the Tower Pro SG90 servo.
 Can it be replicated in Micropython? This is a new mini project, there seems to be little out there yet on how do this but the best so far is this video by PHILG2864:
The closest I have is the following, it is essentially there.
from microbit import *
pin0.set_analog_period(20)
while True:
pin0.write_analog(180)
sleep(1000)
pin0.write_analog(1)
sleep(1000)
Setting the time period to 20ms pin0.set_analog_period(20)seems by experiment (and used in the video above) to be best value so far. The reason for pin0.write_analog(1) set to 1 instead of 0, 0 seems to stop the whole thing.
All opinions in this blog are the Author's and should not in any way be seen as reflecting the views of any organisation the Author has any association with. Twitter @scottturneruon
The code uses Microsoft Blocks taken from the post, runs the servos 180 degrees and back again, when button A is pressed. It does exactly what it should. I am also using the Tower Pro SG90 servo.
The closest I have is the following, it is essentially there.
from microbit import *
pin0.set_analog_period(20)
while True:
pin0.write_analog(180)
sleep(1000)
pin0.write_analog(1)
sleep(1000)
Setting the time period to 20ms pin0.set_analog_period(20)seems by experiment (and used in the video above) to be best value so far. The reason for pin0.write_analog(1) set to 1 instead of 0, 0 seems to stop the whole thing.
All opinions in this blog are the Author's and should not in any way be seen as reflecting the views of any organisation the Author has any association with. Twitter @scottturneruon
Subscribe to:
Posts (Atom)
Top posts on this blog in March 2024
The Top 10 viewed post on this blog in March 2024. Covering areas such as small robots, augmented reality, Scratch programming, robots. Micr...