Showing posts with label line follower. Show all posts

Friday 30 December 2016

Neuron Controlled Edge follower updated

In the last post experimentation with an artificial neuron controlling the Bit:Bot to follow the edge of a line (it follows the left-hand side of the line).


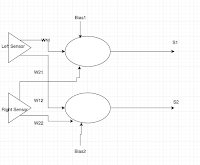
More details can be found in the previous post.The neurons (well two separate ones, S1 and S2) are produced using weighted sums - summing the weights x inputs [ right-hand sensor (rs) and left-hand sensor (ls)] plus a bias for each neuron in this case w[0] and w[3].
    net=w[0]+w[1]*rs+w[2]*ls      
    net2=w[3]+w[4]*rs+w[5]*ls


If weighted sum >=0 then its output 1 otherwise 0


What actual causes S1 to be either 1 or 0 is all defined by a set of weights w (three for the first neurone, S1,  three for S2).

w=[0,-1,1,-1,1,-1]


Modifications to the code in the last post have been around fine tuning the values in converting the outputs of the two neurons S1 and S2 into actions as shown below.
    if s1==1 and s2==1:
        forward(20)   
    elif s1==0 and s2==1:
        forward(15)
        right_turn(25)
    elif s1==1 and s2==0:
        forward(15)
        left_turn(25)       
    elif s1==0 and s2==0:
        backward(5)

The functions for forward, right_turn, etc are defined elsewhere.


To change the function of the system, change the values in wThe complete code is shown below.


Code
from microbit import *
import neopixel, random, array

w=[]  

def forward(n):
    pin0.write_analog(551)
    pin8.write_digital(0) 
    pin1.write_analog(551)
    pin12.write_digital(0)
    sleep(n)
    
def backward(n):
    pin0.write_analog(551)
    pin8.write_digital(1) 
    pin1.write_analog(551)
    pin12.write_digital(1)
    sleep(n)
    
def right_turn(n):
    pin0.write_analog(511)
    pin8.write_digital(0) 
    pin1.write_analog(511)
    pin12.write_digital(1)
    sleep(n)
    
def left_turn(n):
    pin0.write_analog(551)
    pin8.write_digital(1) 
    pin1.write_analog(551)
    pin12.write_digital(0)
    sleep(n)
       
w=[0,-1,1,-1,1,-1]

while True:
    ls= pin11.read_digital()
    rs= pin5.read_digital()
    
    net=w[0]+w[1]*rs+w[2]*ls
    net2=w[3]+w[4]*rs+w[5]*ls

    if net>=0:
        s1=1
    else:
        s1=0

    if net2>=0:
        s2=1
    else:
        s2=0
   
    if s1==1 and s2==1:
        forward(20)   
    elif s1==0 and s2==1:
        forward(15)
        right_turn(25)
    elif s1==1 and s2==0:
        forward(15)
        left_turn(25)       
    elif s1==0 and s2==0:
        backward(5)


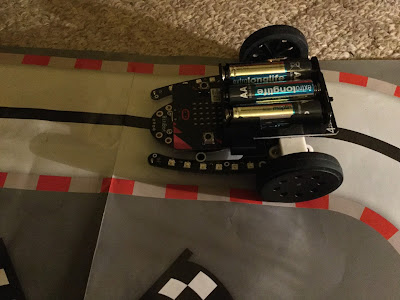
Video of it in action:


Please feel free to use the code and improve on it, and I would especially welcome the seeing the improvement through the comments.


All opinions in this blog are the Author's and should not in any way be seen as reflecting the views of any organisation the Author has any association with. Twitter @scottturneruon

Friday 23 December 2016

4Tronix Bit:Bot Neuron Controlled Edge follower

In the last post I was playing with 4Tronix's Bit:Bot. In this post I will show the initial experimentation with an artificial neuron controlling the Bit:Bot to follow the edge of a line (it follows the left-hand side of the line).


The neurons (well two separate ones, S1 and S2) are produced using weighted sums - summing the weights x inputs [ right-hand sensor (rs) and left-hand sensor (ls)] plus a bias for each neuron in this case w[0] and w[3].


    net=w[0]+w[1]*rs+w[2]*ls      
    net2=w[3]+w[4]*rs+w[5]*ls


  If weighted sum >=0 then its output 1 otherwise 0
    if net>=0: 
        s1=1
    else:
        s1=0

    if net2>=0:
        s2=1
    else:
        s2=0

What actual causes S1 to be either 1 or 0 is all defined by a set of weights w (three for the first neurone, S1,  three for S2).

w=[0,-1,1,-1,1,-1]


Converting the outputs of the two neurones S1 and S2 into actions is shown below.
    if s1==1 and s2==1:
        forward(40)   
    elif s1==0 and s2==1:
        forward(30)
        right_turn(10)
    elif s1==1 and s2==0:
        forward(30)
        left_turn(10)       
    elif s1==0 and s2==0:
        backward(40)

The functions for forward, right_turn, etc are defined elsewhere.


At the moment the movement is a bit rough and it is a little simpler to build a version that follows the centre of the line; this approach though, works with thinner lines. 

To change the function of the system, change the values in w; for example to produce one that follows the centre of the line just change w (I will leave that to someone to work on). The complete code is shown below.


Code
from microbit import *
import neopixel, random, array

w=[]  

def forward(n):
    pin0.write_analog(551)
    pin8.write_digital(0) 
    pin1.write_analog(551)
    pin12.write_digital(0)
    sleep(n)
    
def backward(n):
    pin0.write_analog(551)
    pin8.write_digital(1) 
    pin1.write_analog(551)
    pin12.write_digital(1)
    sleep(n)
    
def right_turn(n):
    pin0.write_analog(511)
    pin8.write_digital(0) 
    pin1.write_analog(511)
    pin12.write_digital(1)
    sleep(n)
    
def left_turn(n):
    pin0.write_analog(551)
    pin8.write_digital(1) 
    pin1.write_analog(551)
    pin12.write_digital(0)
    sleep(n)
       
w=[0,-1,1,-1,1,-1]

while True:
    ls= pin11.read_digital()
    rs= pin5.read_digital()
    
    net=w[0]+w[1]*rs+w[2]*ls
    net2=w[3]+w[4]*rs+w[5]*ls

    if net>=0:
        s1=1
    else:
        s1=0

    if net2>=0:
        s2=1
    else:
        s2=0
   
    if s1==1 and s2==1:
        forward(40)   
    elif s1==0 and s2==1:
        forward(30)
        right_turn(10)
    elif s1==1 and s2==0:
        forward(30)
        left_turn(10)       
    elif s1==0 and s2==0:
        backward(40)


All opinions in this blog are the Author's and should not in any way be seen as reflecting the views of any organisation the Author has any association with. Twitter @scottturneruon

Saturday 24 September 2016

Crumblebot - explorer bot?

In an earlier post I played with 4Tronix's CrumbleBot to make an edge follower robot (http://robotsandphysicalcomputing.blogspot.co.uk/2015/07/edge-following-crumblebot.html). I wanted to play a little more, so I looked at making it 'explore' a room a bit and recently 4Tronix's have released an add-on panning ultrasonic sensor for the CrumbleBot - how can I resist?


What is a CrumbleBot
The CrumbleBot (http://4tronix.co.uk/store/index.php?rt=product/product&product_id=493) is based around the Redfern Electronic's Crumble Controller (http://redfernelectronics.co.uk/crumble/) and Crumble software (http://redfernelectronics.co.uk/crumble-software/); providing an intuitive graphical interface (similar to Scratch) to control two motors and four inputs/outputs. The CrumbleBot comes with a number sensors including  line-detecting sensors and Light-Dependent Resistors for light detection and you use crocodile clips to connect the sensors to the inputs/outputs. In essence, this is nice little framework for simple robotics and quite forgiving; the commands are kept to a minimum and loading the program to the bot is just one action. One suggestion, is to make sure you order the Crumble Controller at the same time as CrumbleBot, it is easy to forget if you haven't already got a crumble controller already.

Building the 'Bot' is relatively simple and 4Tronix have provided some easy to follow instructions on-line (http://4tronix.co.uk/crumble/CrumbleBot.pdf) that are almost foolproof (I manage to build it!).


Panning sensor

This is an add-on piece (http://4tronix.co.uk/store/index.php?rt=product/product&keyword=crumblebot&category_id=0&product_id=556), at the time of writing this costing around £12 (with VAT), which adds a ultrasonic sensor that pans and is controlled using Crumble. The instructions for setting this up are available at http://4tronix.co.uk/blog/?p=1353 you need to read from about half way down the page, they are detailed and please don't do what I did and skim through them, missing out an important action. 


'Explorerbot' 
The Crumblebot is built, the Panning ultrasonic sensor is connected - in my case IO port A for the servo to pan the sensor and IO port D for the input from the sensor - time to program it. The instructions in the set-up http://4tronix.co.uk/blog/?p=1353 include a useful little starting routine to read the sensor and 'zero' the sensor's position.

So my exploring routine is based around 


  • panning the sensor by +/-20 degrees of the sensor facing forward.
  • if an object is 5cm or less from the sensor; reverse the Crumblebot and make a slight turn; otherwise move forward.
The code is shown below:

The video shows the 'Explorerbot' in action.


Conclusion
It is good fun; this is a relatively simple problem but still fun. The Crumble language is Scratch-like and simple to set up and use. Crumble as a system I have, so far, found quite forgiving and this is useful - less fear of making a mistake.The panning sensor gives this already cute robot an even cuter look. Please feel free to add the discussion using the comment section.


All opinions in this blog are the Author's and should not in any way be seen as reflecting the views of any organisation the Author has any association with. Twitter @scottturneruon

Top posts on this blog in March 2024

The Top 10 viewed post on this blog in March 2024. Covering areas such as small robots, augmented reality, Scratch programming, robots. Micr...