Showing posts with label mu. Show all posts

Sunday 9 April 2017

CBiS Education Micro:Bit based Robot Car

At PiWars 2017 (1st-2nd April 2017), thanks to the generosity of CBiS Education, I now have one of their BBC micro:bit RobotCar . It is a sturdy bit of kit, encased in an aluminum chassis with a clear acrylic screen - it feels substantial when you pick it up. 

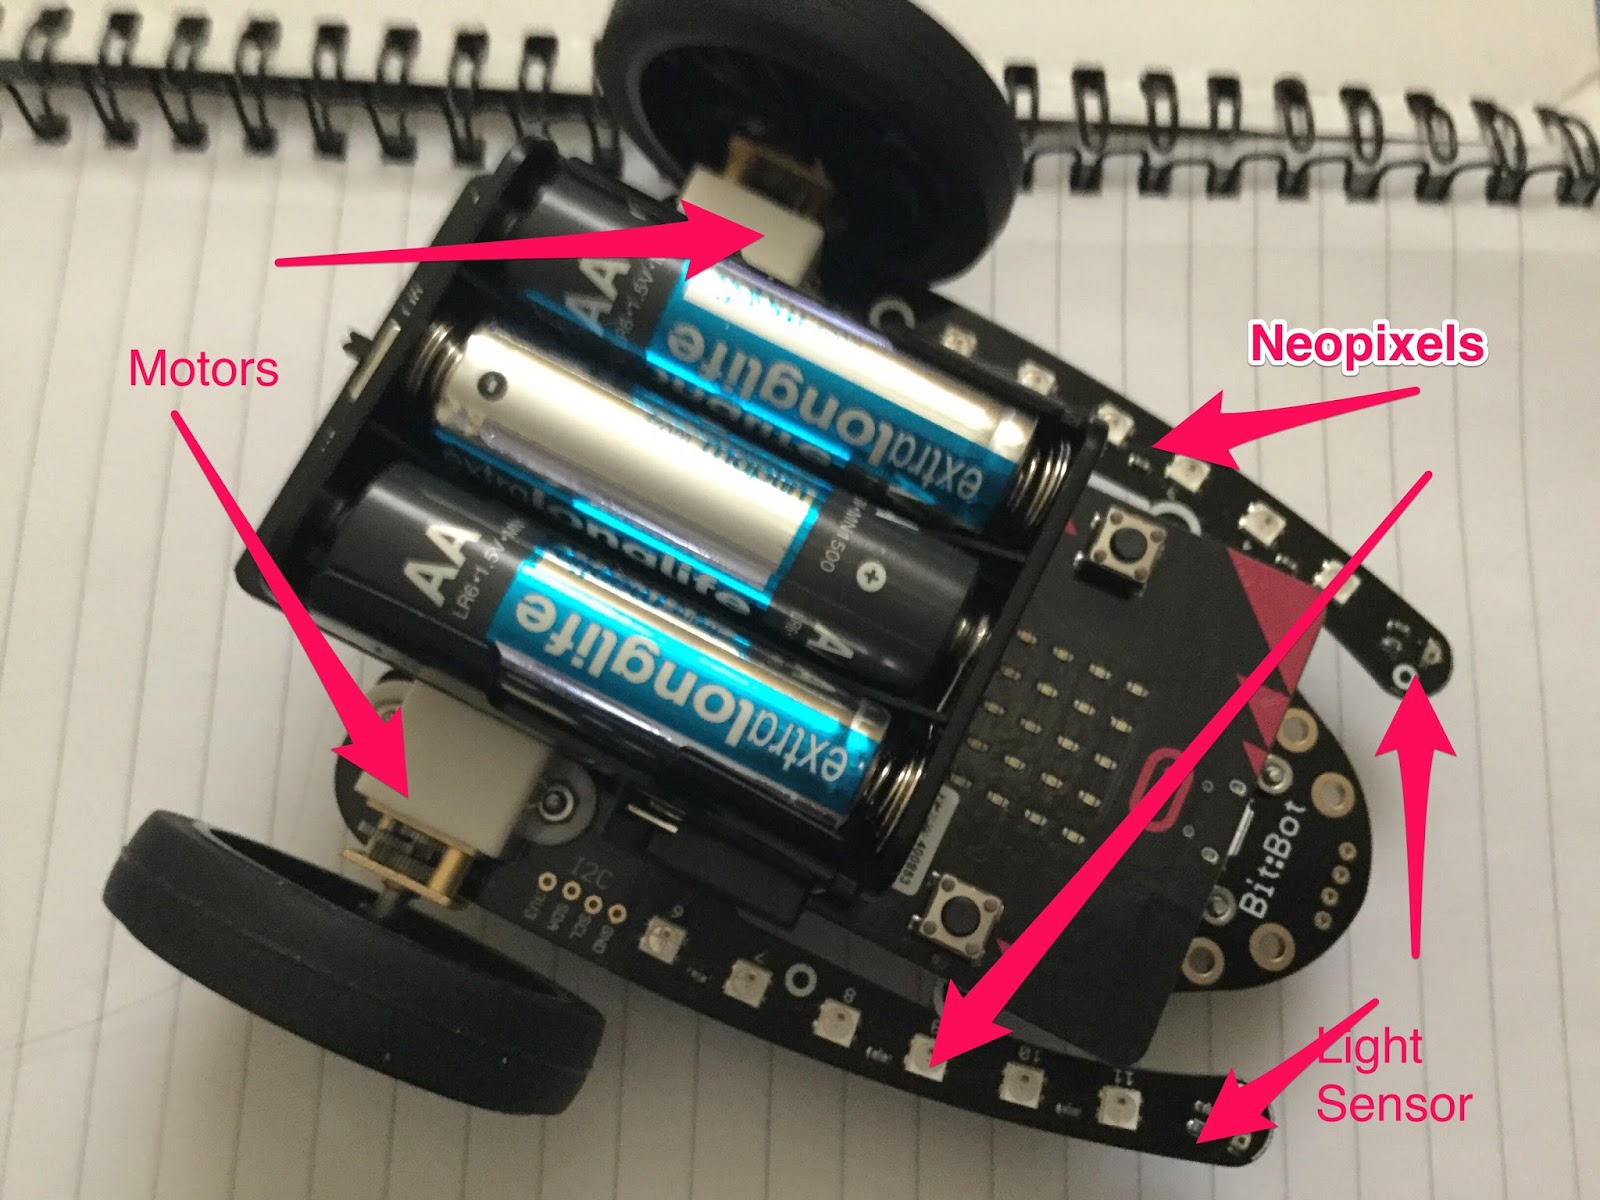
It is based around fours motors, control by a Micro:Bit, via L298N based motor controller/shield. Batteries power, 8 AAs, the motors and a Lithium powerbank to power the Micro:Bit - all included. 

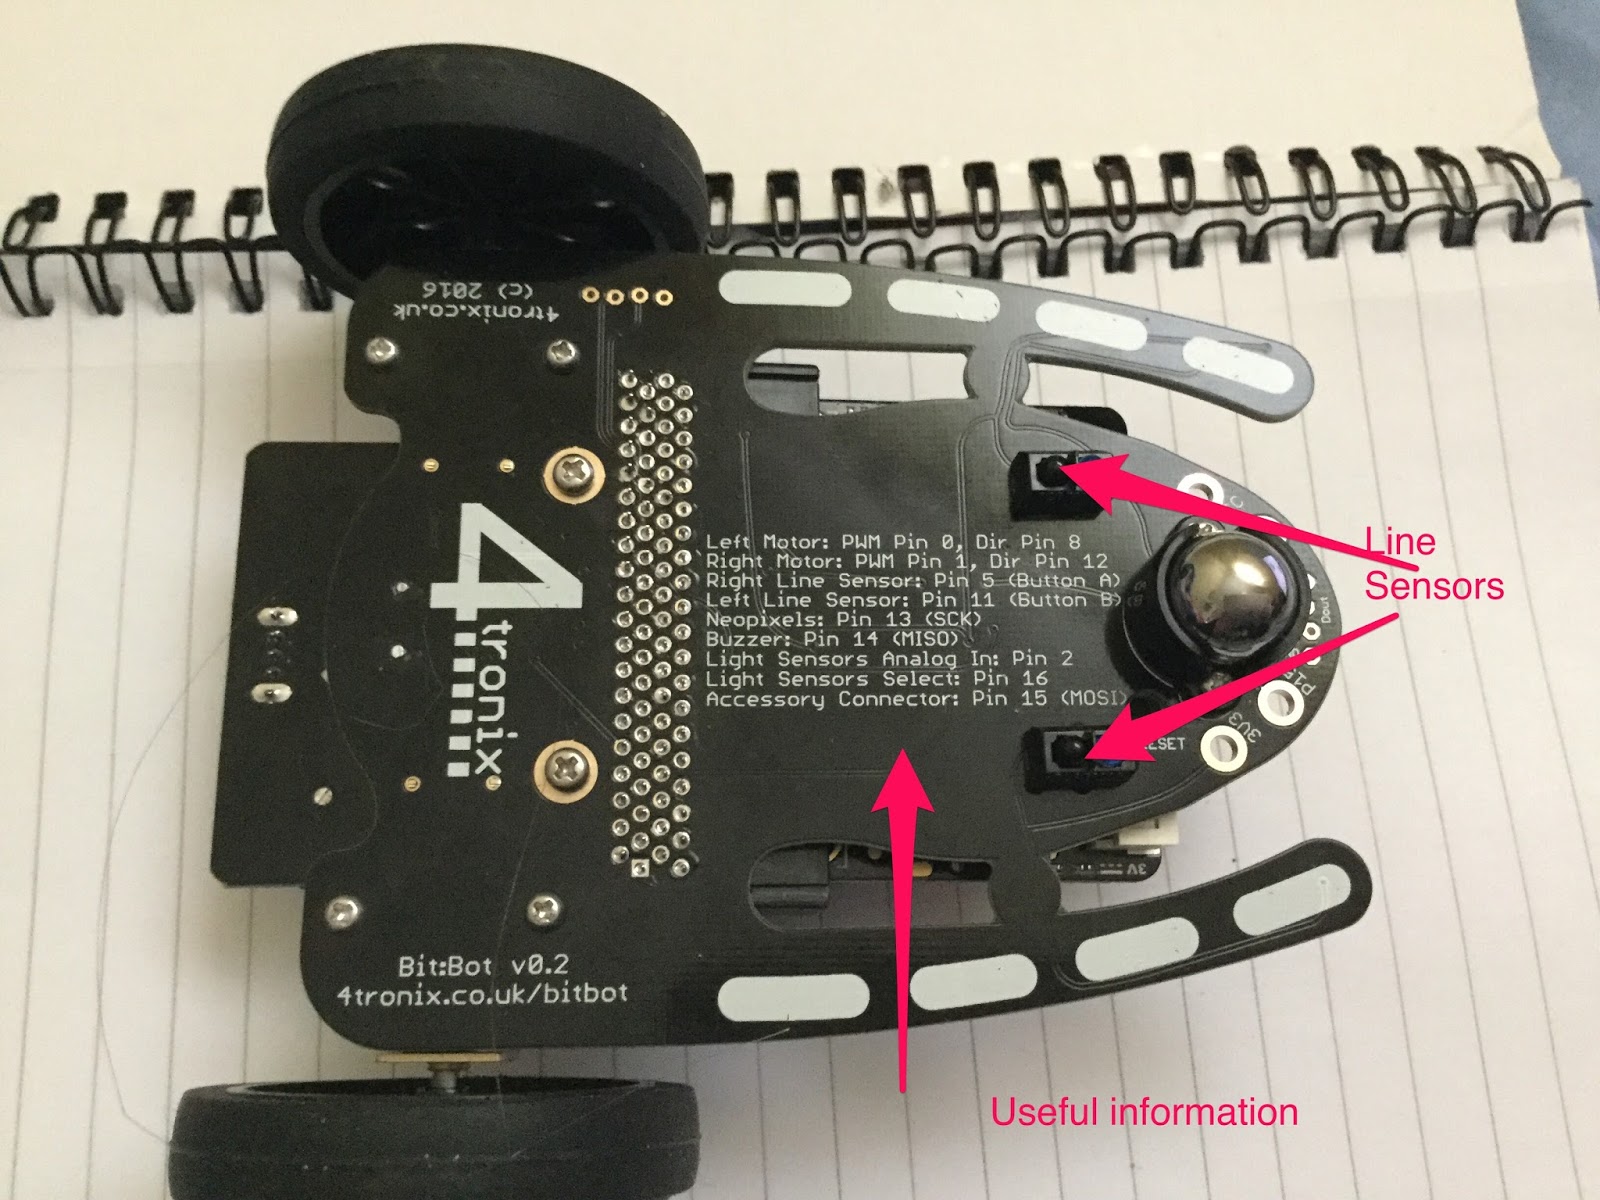
More information about the technical details and example software can be found on their site https://www.cbis.education/robotic-car-kit# including further details on the L298N based motor controller/shield, which I found useful for programming it. 


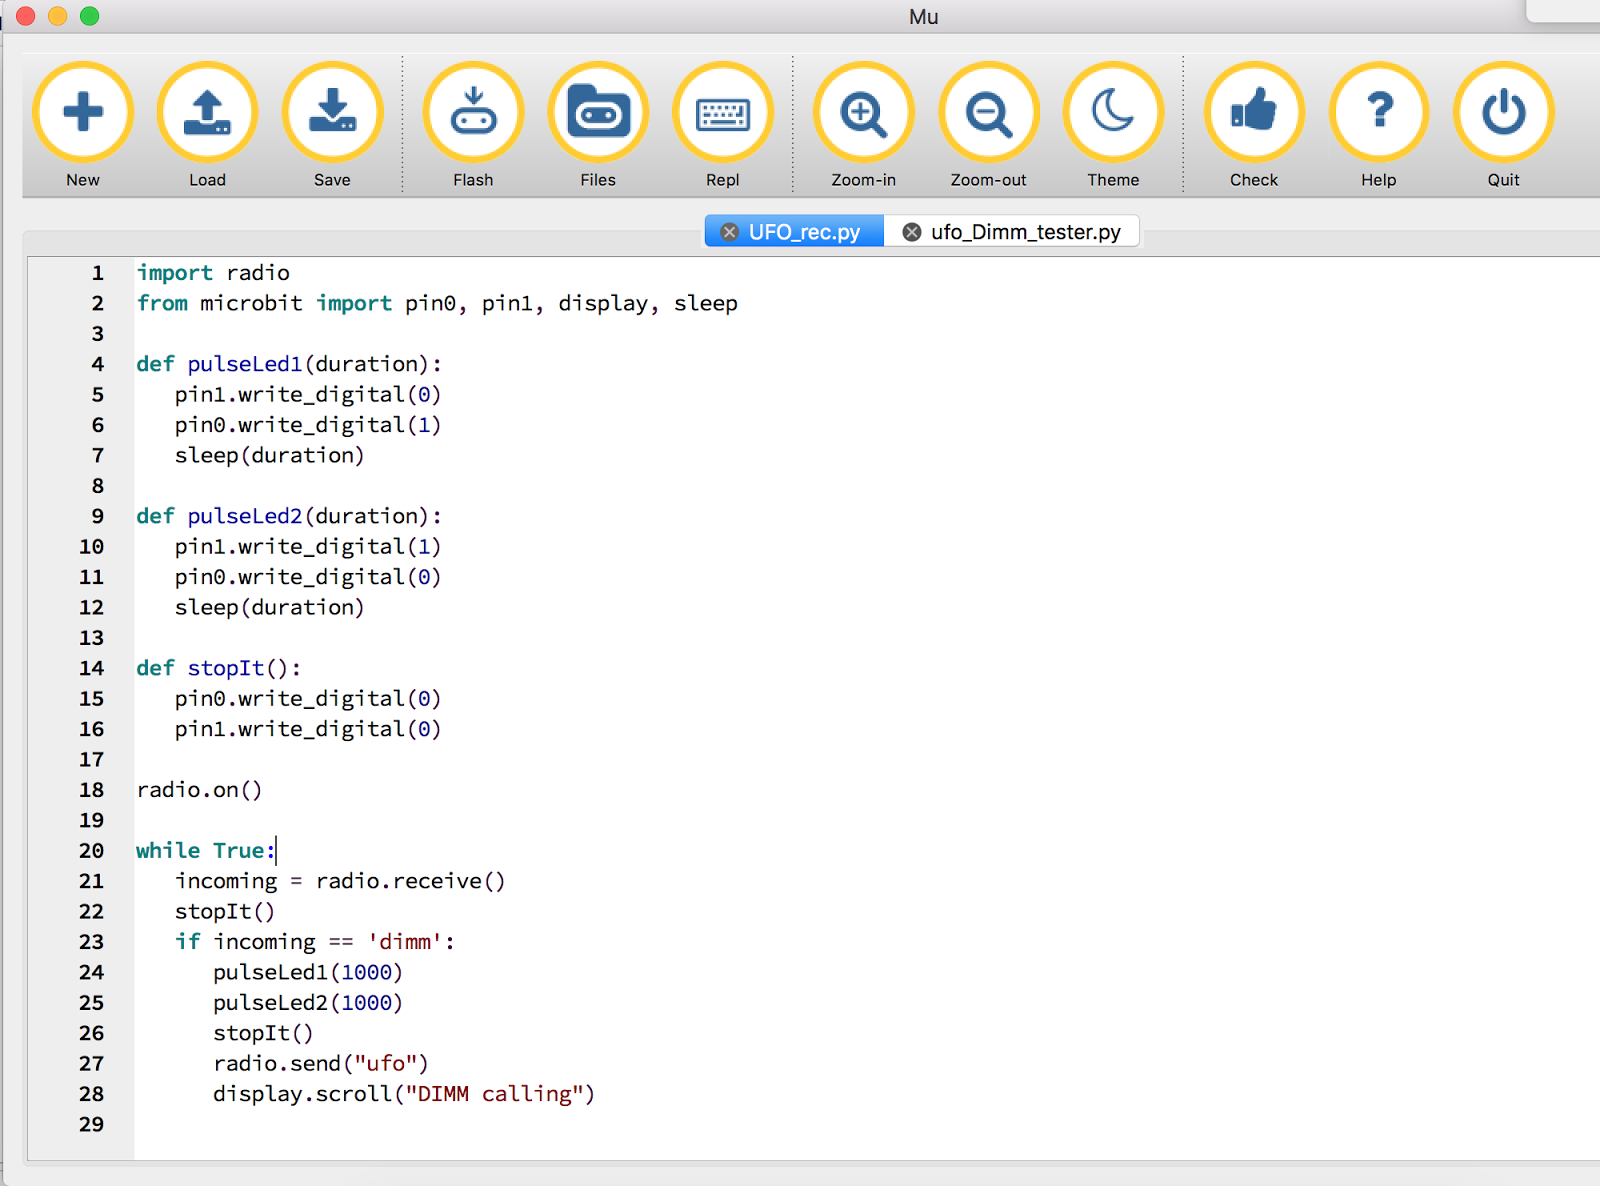
I have experimented briefly with programming it in Python (micropython), getting it to it move forward, backward; to the right and left, using the Mu editor. 

The code is shown below for those who want to try it:

from microbit import *


def forward(n):
    pin13.write_digital(1)
    pin16.write_digital(1)
    sleep(n)
    
def backward(n):
    pin14.write_digital(1)
    pin15.write_digital(1)
    sleep(n)

def stopit(n):
    pin13.write_digital(0)
    pin14.write_digital(0)
    pin15.write_digital(0)
    pin16.write_digital(0)
    sleep(n)

def spinLeft(n):
    pin13.write_digital(1)
    pin15.write_digital(1)
    sleep(n)

def spinRight(n):
    pin14.write_digital(1)
    pin16.write_digital(1)
    sleep(n)


while True:
    forward(500)
    stopit(1000)
    backward(500)
    stopit(1000)
    spinRight(1000)
    stopit(1000)
    spinLeft(1000)
    stopit(1000)


This thing is quick. I like the feel of it, you pick it up and it doesn't feel like it is going to fall apart; because it comes all assembled - including batteries, it is ready to go. I look forward to trying some more ideas on it.


All opinions in this blog are the Author's and should not in any way be seen as reflecting the views of any organisation the Author has any association with. Twitter @scottturneruon

Sunday 18 December 2016

4Tronix Bit:Bot - now there is a good idea.

When I first heard of this robot, my first thought was what a great idea; a robot with neopixels (I know I should be saying 'smart RGB LEDs' but neopixels is so much more snappier) controlled via a micro:bit.


A good starting point for learning more about this robot, is the details on the 4Tronix site/blog, which includes build guidance and programming instructions for micropython and PXT. Though for the micropython code you might need to change pinX.digital_write() to pinX.write_digital() where X is the pin number.

My play code was to randomly select which neopixels to light up, I didn't include code to turn them off so multiple ones can be on. The robot is driven forwards, waits, backward, waits, turns to the right and then the left; and then repeats. 

Code:
from microbit import *
import neopixel, random

np = neopixel.NeoPixel(pin13, 12)

def forward(n):
    pin0.write_digital(1)
    pin8.write_digital(0) 
    pin1.write_digital(1)
    pin12.write_digital(0)
    sleep(n*1000)
    
def halt(n):
    pin0.write_digital(0)
    pin8.write_digital(0)
    pin1.write_digital(0)
    pin12.write_digital(0)
    sleep(n*1000)
    
def backward(n):
    pin0.write_digital(0)
    pin8.write_digital(1) 
    pin1.write_digital(0)
    pin12.write_digital(1)
    sleep(n*1000)

def right_turn(n):
    pin0.write_digital(1)
    pin8.write_digital(0) 
    pin1.write_digital(0)
    pin12.write_digital(1)
    sleep(n*1000)

def left_turn(n):
    pin0.write_digital(0)
    pin8.write_digital(1) 
    pin1.write_digital(1)
    pin12.write_digital(0)
    sleep(n*1000)

while True:
    pxl=random.randint(1,11)
    rd=random.randint(1,32)
    gr=random.randint(1,32)
    bl=random.randint(1,32)
    t1=random.randint(10,100)
    np[pxl] = (rd, gr, bl)
    np.show()
    forward(1)
    halt(1)
    backward(1)
    halt(1)
    right_turn(1)

    left_turn(1)

The video below shows it in action, the code is simple but this is a lovely robot to program especially if the mu editor is used.


All opinions in this blog are the Author's and should not in any way be seen as reflecting the views of any organisation the Author has any association with. Twitter @scottturneruon

Monday 24 October 2016

Dancing pixels

In previous post I played with using the combination of the Proto-Pic Micro:pixel and Micro:Bit to react, using the accelerometer, to music through a computer speakers. The vibrations from the music shake the Micro:Bit enough to give measurable changes in three axis, and these values are used to change the pixels colour.


The latest version of this uses most of pixels.


Coded in micropython using the Mu editor.

from microbit import *
import neopixel, random

np = neopixel.NeoPixel(pin0, 32)

while True:
    for pxl in range (2,32, 5):
        rd=int(abs(accelerometer.get_x())/20)
        gr=int(abs(accelerometer.get_y())/20)
        bl=int(abs(accelerometer.get_z())/20)
        np[pxl] = (rd, gr, 0)
        np[pxl-1] = (rd, gr, 0)
        np[pxl+1] = (0, gr, rd)
        np[pxl-2] = (rd, 0, 0)
        np[pxl+2] = (0, gr,0)
        np.show()

Video of it action, using royalty-free music Electro Deluxe by My Free Mickey feat. Gurdonark. http://dig.ccmixter.org/files/myfreemickey/48180


As one of the reviewers on Proto-Pic site states, the box the Micro:pixel comes in does make a good diffuser.

All opinions in this blog are the Author's and should not in any way be seen as reflecting the views of any organisation the Author has any association with. Twitter @scottturneruon

Sunday 25 September 2016

UFO talks to Robot - part two

In part one of this series of posts, the project to get Consumable Robotics UFO and Dimm robot was started but focussed on the UFO kit. The goal being for some action on Dimm to trigger a series of messages being passed between the two of them.

In this post, the focus moves to Dimm and the setting up the actions leading to the messaging.

Stage 1 Build
Using the Micro:bits port 0 (as part of the Dimm robot) for the input from the light sensor, which is included in the kit (Red lead going to 3v and the black lead going to GND). Just to note the less light there is the higher the value on the sensor.


Stage 2 Code
Micropython programmed through the Mu editor (see below)

If light levels are high then :
      scroll a message saying "calling UFO" 
      send the code "dimm" via bluetooth.
otherwise: 
      scroll a message saying "I can't see"
If it recieves "ufo" via bluetooth :
      display "Hello, UFO called me"

Micropython code
import radio
from microbit import pin0, pin1, display, sleep

radio.on()

while True:
   incoming = radio.receive()
   if incoming == 'ufo':  
      display.scroll("Hello, UFO called me", 75)
   if pin0.read_analog()<175:
        display.scroll("calling UFO")
        radio.send("dimm")
   else:
        display.scroll("I can't see")

Stage 3 Testing

Video below shows it in action including what happens when the light (in this case a torch) shines on the sensor connected to Dimm; a message is sent and picked up by the UFO kit (LEDs flash and the message saying "DIMM calling" scrolls  across the UFO LED array - see UFO talks to robot - part one for more details). A message is sent back from the UFO kit and on Dimm's LED array the message "Hello, UFO called me").
If the light levels are too low then the message "I can't see" scrolls across Dimm's LED array.


As an aside, the Dimm robot still reminds me, a little, of a colourful, friendly, Ood from Dr Who with all the leads hanging out of the 'mouth' - think that is geeky I know.


All opinions in this blog are the Author's and should not in any way be seen as reflecting the views of any organisation the Author has any association with. Twitter @scottturneruon

UFO talks to Robot - part one

In previous posts (UFO has Landed and DIMM the OOD),  I started playing with the CBiSEducation's UFO consumable robots. Still using the Micro:Bit, in this two part post series, I am going to be playing with using Micropython to send messages between the two kits.


Stage 1 Wiring and Set up-UFO
Pins 0 and 1 are outputs to the LEDs
The black leads on the UFO go to GND.

Micropython, using the Micro:Bit's built in radio module (Bluetooth), is used to communication between the two kits.


Stage 2 Code -UFO
The code is set to flash the UFO's LEDs and then scroll a message "DIMM Calling" when it receives a message "dimm" via Bluetooth. 

Basic overview is
- Turn on the radio module - radio.on()
- If the message is received then turn the LEDs on and off and scrolls "DIMM calling" across the LED array.
- send a message via bluetooth "ufo" to whoever is listening (in the end the robot DIMM hopefully). The code is shown below. 

import radio
from microbit import pin0, pin1, display, sleep

def pulseLed1(duration):
   pin1.write_digital(0)
   pin0.write_digital(1)
   sleep(duration)
   
def pulseLed2(duration):
   pin1.write_digital(1)
   pin0.write_digital(0)
   sleep(duration)
   
def stopIt():
   pin0.write_digital(0)
   pin1.write_digital(0)

radio.on()

while True:
   incoming = radio.receive()
   stopIt()
   if incoming == 'dimm':   
      pulseLed1(1000)
      pulseLed2(1000)
      stopIt()
      radio.send("ufo")
      display.scroll("DIMM calling")

To use the radio module you will need to switch to the mu editor (http://codewith.mu/).


Stage 3 Testing it
To test it, a second Micro:bit was used to send test signals (the code for this is shown below). When button A is pressed on the second Micro:Bit a message 'dimm' is sent followed by sending 'not'.

import radio
from microbit import button_a, button_b, sleep

radio.on()

while True:
   if button_a.is_pressed():
       radio.send('dimm')
       radio.send('not')
       
   if button_b.is_pressed():
       radio.send('ufo')
       radio.send('not')


The UFO does cycle through the sequence LEDs flash and the message scrolls. The slight bug is in repeats it several times before it stops; possibly a buffering issue somewhere.


Stage 4 
In the next post (http://bit.ly/2d3zlh0), I will be building the Robot DIMM part of the system - sending and receiving message and detecting light levels in micropython.


All opinions in this blog are the Author's and should not in any way be seen as reflecting the views of any organisation the Author has any association with. Twitter @scottturneruon

Sunday 11 September 2016

Do it yourself: Remote Controlled Micro:Bit Junkbot

In an earlier post, I showed how you could build a Micro:Bit controlled Junkbot. In this post I want to show a modification to it, to use one Micro:Bit to control the junkbot controlled by another Micro:Bit. A nice feature of the Micro:Bit using micropython, is it can send and receive simple messages via radio - so here is my take on it.

The first problem is the Python editor available on https://www.microbit.co.uk/ does not seem to work with the radio API. One solution to this is to change to the mu editor.


Two pieces of code are needed.

Sending Code for the 'remote' control:
Essentially it is set up to send two messages, via the built-in radio module, spinl or spinr depending on which button is pressed.

import radio
from microbit import button_a, button_b

radio.on()

while True:
   if button_a.is_pressed():
       radio.send('spinl')
   if button_b.is_pressed():

       radio.send('spinr')

Junkbot Code
This takes an adapted form of the previous Junkbot code to work by; on receiving spinl or spinr via the radio link; spin the motor clockwise or anticlockwise.
import radio
from microbit import pin8, pin12, sleep

def leftTurn(duration):
   pin8.write_digital(0)
   pin12.write_digital(1)
   sleep(duration)
   
def rightTurn(duration):
   pin8.write_digital(1)
   pin12.write_digital(0)
   sleep(duration)
   
def stopIt():
   pin8.write_digital(0)
   pin12.write_digital(0)

radio.on()
while True:
   incoming = radio.receive()
   if incoming == 'spinl':
        leftTurn(500)
        stopIt()
   if incoming == 'spinr':
        rightTurn(500)
        stopIt()


All opinions in this blog are the Author's and should not in any way be seen as reflecting the views of any organisation the Author has any association with.

Top posts on this blog in March 2024

The Top 10 viewed post on this blog in March 2024. Covering areas such as small robots, augmented reality, Scratch programming, robots. Micr...