Speech Recognition in Scratch 3 - turning Hello into Bonjour!
The Raspberry Pi Foundation recently released a programming activity Alien Language , with support Dale from Machine Learning for Kids , tha...
PS3 Controller to move a USB Robot Arm
Guest Blogger Hiren Mistry, Nuffield Research Placement Student working at the University of Northampton. How to use a PS3 Controller to...
Scratch Robot Arm
It is not physical but CBiS Education have release a free robot arm simulator for Scratch. Downloadable from their site http://w...
Tinkercad and Microbit: To make a neuron
The free online CAD (and so much more) package Tinkercad https://www.tinkercad.com/ under circuits; now has microbits as part of the list ...
Escape the Maze with a VR robot - Vex VR
You don't need to buy a robot to get programming a robot, now there are a range of free and relatively simple to start with robot simula...
Easy, Free and no markers Augmented Reality - location based AR
For a few years, I have been a fan of Aframe and AR.js - these are fantastic tools for creating web-based Virtual and Augmented Reality. No...
Coral Dev Board and Raspberry Pi
This is the second of a planned occasional series of posts on playing with some of the current AI specific add-on processors for Intenet of ...
Explaining the Tinkercad microbit Neural network
In a previous post, I looked at developing a neural network in Tinkercad around the Microbit (details available here ) and the whole model ...
VR robot in a maze - from Blocks to Python
Recently I produced a post about playing with Vex Robotics VexCode VR blocks and the Maze Playground. The post finished with me saying I w...
4tronix Eggbit - cute and wearable - hug avoider
/ The ever-brilliant 4tronix have produced Eggbit https://shop.4tronix.co.uk/collections/microbit-accessories/products/eggbit; a cute, wear...
Showing posts with label python. Show all posts
Showing posts with label python. Show all posts
Friday 31 December 2021
Top 10 viewed posts 2021 on the Robot and Physical Computing Blog
Sunday 26 December 2021
Hug Avoider 4 - micropython, Eggbot and speech
The last of the posts on the Hug avoider and the 4Tronix's Eggbit
4Tronix's Eggbit (in fact I bought three of them https://shop.4tronix.co.uk/collections/bbc-micro-bit/products/eggbit-three-pack-special :-) recently) is a cute add-on for the microbit. In three previous posts I looked at eggbit using microcode to produce a hug avoider - warns when people at too close.

In this post using the buttons and adding (via Microbit V2 with its speaker) simple speech
1. Buttons
Pins for the buttons
- pin8 - Green button
- pin12 - Red button
- pin14 - Yellow button
- pin`6 - Blue button
if pin12.read_digital()==1:
#Red Button
blank_it()
if pin8.read_digital()==1:
#Green button
startingMessage()
if pin14.read_digital()==1:
#Yellow button
rainbow()
if pin16.read_digital()==1:
#Blue botton
display.show(Image.ASLEEP)
2. Speech
The basis on the code is take from https://microbit-micropython.readthedocs.io/en/latest/tutorials/speech.html
mess1 = [
"This is the hug avoide",
"please keep back",
]
# Take from https://microbit-micropython.readthedocs.io/en/latest/tutorials/speech.html
for line in mess1:
speech.say(line, speed=120, pitch=100, throat=100, mouth=200)
sleep(500
The speech is difficult to hear but is fun and there are possibly ways to improve this starting with the information on https://microbit-micropython.readthedocs.io/en/latest/tutorials/speech.html
3. Overall
from microbit import *
from machine import time_pulse_us
import neopixel, speech
sonar =pin15
sonar.write_digital(0)
fireled=neopixel.NeoPixel(pin13,9)
def rainbow():
fireled[0] = (255, 0, 40)
fireled[1]= (255,165,0)
#block=yellow
fireled[2] = (255,255,0)
#block=green
fireled[3] = (0,255,0)
#block=blue
fireled [4] = (0,0,255)
# block=indigo
fireled[5] = (75,0,130)
# block=violet
fireled[6] = (138,43,178)
#block=purple
fireled[7] = (255,0,255)
fireled.show()
def blank_it():
for j in range(8):
fireled[j] = (63, 0, 0)
fireled.show()
def howfar():
sonar.write_digital(1)
sonar.write_digital(0)
timeus=time_pulse_us(sonar,1)
echo=timeus/1000000
dist=(echo/2)*34300
sleep(100)
return dist
def startingMessage():
mess1 = [
"This is the hug avoide",
"please keep back",
]
# Take from https://microbit-micropython.readthedocs.io/en/latest/tutorials/speech.html
for line in mess1:
speech.say(line, speed=120, pitch=100, throat=100, mouth=200)
sleep(500)
def buttonplay():
if pin12.read_digital()==1:
#Red Button
blank_it()
if pin8.read_digital()==1:
#Green button
startingMessage()
if pin14.read_digital()==1:
#Yellow button
rainbow()
if pin16.read_digital()==1:
#Blue botton
display.show(Image.ASLEEP)
while True:
buttonplay()
dist=howfar()
if dist>30:
pin2.write_digital(1)
pin0.write_digital(0)
display.show(Image.HAPPY)
else:
pin2.write_digital(1)
pin0.write_digital(1)
blank_it()
speech.say("back away please", speed=120, pitch=100, throat=100, mouth=200)
display.show(Image.ANGRY)
Thursday 23 December 2021
Hug Avoider 3 - experiments with Python and 4Tronix Eggbit

4Tronix's Eggbit (in fact I bought three of them https://shop.4tronix.co.uk/collections/bbc-micro-bit/products/eggbit-three-pack-special :-) recently) is a cute add-on for the microbit (see above). In two previous posts I looked at eggbit using microcode to produce a hug avoider - warns when people at too close.
This post replicates some of this, but this time using Python and shows the stages of the build
- Get the ultrasound to find the distance;
- Produce smile and surprise on the eggbit's 'mouth';
- Produce rainbow on the neopixels or all the pixels turning red;
- Bring it all together so if the person is too close, less than 30cm it reacts.
1. Ultrasonic detection
Probably the most challenging bit of this was getting the ultrasonic distance measrement working. It actually is not that difficult; especially using code from https://firialabs.com/blogs/lab-notes/ultrasonic-distance-sensor-with-python-and-the-micro-bit as the basis of the solution and pin15 does both triggering and receiving. Code sends a pulse out, picked up and processed to get the distance from the delay. The code is shown below:
from microbit import *
from machine import time_pulse_us
sonar =pin15
sonar.write_digital(0)
while True:
sonar.write_digital(1)
sonar.write_digital(0)
timeus=time_pulse_us(sonar,1)
echo=timeus/1000000
dist=(echo/2)*34300
sleep(100)
display.scroll(str(dist))
2. LEDs
To get a greater understanding of how 4Tronix's makecode extension (used in the previou posts) for the Eggbit controls the various pins the best resource was to reverse engineering the code from https://github.com/4tronix/EggBit/blob/main/eggbit.ts in their github respository for the Eggbit.
This gave the colours and the correct pin for the LEDs the code is shown below. Producing a rainbow method and a method to set the LEDs/neopixels to red.
import neopixel
fireled=neopixel.NeoPixel(pin13,9)
def rainbow():
fireled[0] = (255, 0, 40)
fireled[1]= (255,165,0)
#block=yellow
fireled[2] = (255,255,0)
#block=green
fireled[3] = (0,255,0)
#block=blue
fireled [4] = (0,0,255)
# block=indigo
fireled[5] = (75,0,130)
# block=violet
fireled[6] = (138,43,178)
#block=purple
fireled[7] = (255,0,255)
fireled.show()
def blank_it():
for j in range(8):
fireled[j] = (63, 0, 0)
fireled.show()
3. 'Face'
Eggbit has set of LEDs that represent a mouth, controlled via three pins. Only two of those are used in this example
'Smile' is pin2.write_digital(1) the 'lower' part of the mouth and turn off upper part of the mouth pin0.write_digital(0)
'Surprise' uses both parts
pin2.write_digital(1)
pin0.write_digital(1)
4. Overall
So putting this altogether
from microbit import *
from machine import time_pulse_us
import neopixel
sonar =pin15
sonar.write_digital(0)
fireled=neopixel.NeoPixel(pin13,9)
def rainbow():
fireled[0] = (255, 0, 40)
fireled[1]= (255,165,0)
#block=yellow
fireled[2] = (255,255,0)
#block=green
fireled[3] = (0,255,0)
#block=blue
fireled [4] = (0,0,255)
# block=indigo
fireled[5] = (75,0,130)
# block=violet
fireled[6] = (138,43,178)
#block=purple
fireled[7] = (255,0,255)
fireled.show()
def blank_it():
for j in range(8):
fireled[j] = (63, 0, 0)
fireled.show()
def howfar():
sonar.write_digital(1)
sonar.write_digital(0)
timeus=time_pulse_us(sonar,1)
echo=timeus/1000000
dist=(echo/2)*34300
sleep(100)
return dist
while True:
dist=howfar()
if dist>30:
pin2.write_digital(1)
pin0.write_digital(0)
rainbow()
display.show(Image.HAPPY)
else:
pin2.write_digital(1)
pin0.write_digital(1)
blank_it()
display.show(Image.ANGRY)
Tuesday 29 June 2021
Microbit and Environment Measurement - Using Python
In two recent posts, Makecode was used with the Enviro:bit from Pimoroni to try out a few ideas (https://robotsandphysicalcomputing.blogspot.com/2021/06/pimoroni-envirobit.html and https://robotsandphysicalcomputing.blogspot.com/2021/06/pimoroni-envirobit-light-and-led.html ). In this post Pyton using the Mu editor was used to try out the Enviro:bit.

As in the makeCode version, Pimoroni has provided both a python library (via Github) but also within the Readme.md useful installation instructions. There is at the time of writing a possible typo; to get the BME280 sensor (temperature, pressure, humidity sensor) to work; you need to add parenthesis in the line bme = bme280.bme280()
After that, it works fine and includes potential altitude measurement which I don't think is in the Makecode version (though I could be wrong); I need to play with it a bit more.
To experiment the code below was used test reading temperature (in Centigrade), humidity (%), and altitude (feet). In the examples, currently provided with the library, I couldn't find a BME280 example but it was fairly easy to adapt the examples included to get something going.
import microbit
import bme280
bme = bme280.bme280()
while True:
reading = bme.temperature()
microbit.display.scroll("temp: ")
microbit.display.scroll(str(reading))
microbit.sleep(3000)
reading = bme.humidity()
microbit.display.scroll("humidity: ")
microbit.display.scroll(str(reading))
microbit.sleep(3000)
reading = bme.altitude()
microbit.display.scroll("Alt: ")
microbit.display.scroll(str(reading))
microbit.sleep(3000)
It is a cool and fun device to play with, though I not sure the precision of the readings shown on the microbit LEDs is really necessary :-)
Sunday 14 March 2021
Initial experiments with Code Bug Connect

Code Bug has been around for a while, and it is incredibly cute, When it first came, it was a very interesting piece of kit - and it is still is and fun to play with. It spec means it is still a very useful piece of kit.
- 5x5 Red LED display
- 2 buttons
- 6 touch sensitive I/O pads (4 input/output, power and ground)
- Micro USB socket
- CR2032 battery holder
- Expansion port for I2C, SPI and UART
- Blockly-based online programming interface
- CodeBug emulator for checking code before downloading
In 2020 Code Bug launched and successfully funded a Kickstarter campaign (https://www.kickstarter.com/projects/codebug/codebug-connect-cute-colourful-and-programmable-iot-wearable ) for a new version the Code Bug - CodeBug Connect with a serious upgrade.(and the name Connect is highly appropriate with USB tethering and Wifi capability in this version. The technical specification (taken from their site https://www.kickstarter.com/projects/codebug/codebug-connect-cute-colourful-and-programmable-iot-wearable ) shows how much of an upgrade this is:
- 5x5 RGB LEDs with dedicated hardware driver/buffer
- Two 5 way navigation joysticks
- Onboard Accelerometer
- 4 GPIO legs, including high impedance sensing for detecting touch (think MaKey MaKey TM)
- 6 Sewable/croc-clip-able loops. 4 I/O including analogue 1 power and ground
- 6 pin GPIO 0.1" header (configurable for UART/I2C/SPI, I2S or analogue audio out)
- QuadCore -- four heterogeneous processors
- 4MB Flash Storage
- 2.4GHz WiFi 802.11 b/n/g, Station and Soft AP (simultaneous)
- Experimental long range wireless 0.8km to another CodeBug Connect
- UART terminal access over USB
- High efficiency SMPS Boost convertor for battery (JST PH connector)
- High efficiency SMPS Buck convertor from 5V USB
Recently the early version of the Connects have been arriving and it is cool (IMHO).
The getting going guide https://cbc.docs.codebug.org.uk/gettingstarted/quickstart.html lives it up to its name and does a better explanation of doing this than I can provide here.

First I played with the USB and the blockly style programming tool https://www.codebug.org.uk/newide/ (see above) essentially producing a very slightly modified version of their starter code. You can perhaps see the Python style coming in with the while True coming in. Works well and it showed one of the different between this version and the older one; the LEDs are now colourful instead of red only. Programming it, while using the laptops USB to power it does lead to pulling the cable in and out to get the code to run - but that is fine and is clearly explained in the guide
import
cbc
from
color import Color
import
time
while
True:
cbc.display.scroll_text(str(" Bug
1"), fg=Color('#f0ff20'))
time.sleep(1)
They have even thought about security. I set my system to connect via wifi through my phone; but when I want to connect through my laptop I had to go through the adoption process to try it on my phone and a laptop - sounds scary but it is well explained in the getting going guide and is relatively simple to do.
Looking forward to exploring the device a lot more, the guide also includes a number of code examples to play with and explore. A feature I particularly liked was seeing the block code rendered as python when using the editor on the phone.
Monday 22 February 2021
VR robot in a maze - from Blocks to Python
Recently I produced a post about playing with Vex Robotics VexCode VR blocks and the Maze Playground.
The post finished with me saying I would like to play with Python and do a Python version of it. Well it is actually very easy to do it.

You can do it in two stages from the block code. First click on the <> icon (lighted in the figure above and it gives a further view producing Python code that changes as you change the blocks. The last stage is to convert to a text project (button at the bottom right of the screen.

Example of the code.
myVariable = 0
def when_started1():
global myVariable
drivetrain.drive_for(FORWARD, 100, MM)
while not down_eye.detect(RED):
drivetrain.drive_for(FORWARD, 5, MM)
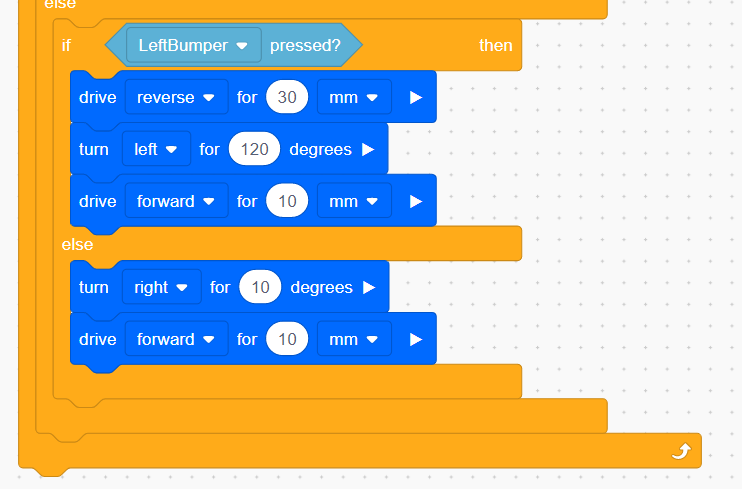
if right_bumper.pressed():
drivetrain.drive_for(REVERSE, 30, MM)
drivetrain.turn_for(LEFT, 20, DEGREES)
drivetrain.drive_for(FORWARD, 20, MM)
else:
if left_bumper.pressed():
drivetrain.drive_for(REVERSE, 30, MM)
drivetrain.turn_for(LEFT, 120, DEGREES)
drivetrain.drive_for(FORWARD, 10, MM)
else:
drivetrain.turn_for(RIGHT, 10, DEGREES)
drivetrain.drive_for(FORWARD, 10, MM)
wait(5, MSEC)
vr_thread(when_started1())
The code in action

This is possibly a nice transition tool going from block-based programming to text-based.
Related posts
Sunday 21 February 2021
Escape the Maze with a VR robot - Vex VR
You don't need to buy a robot to get programming a robot, now there are a range of free and relatively simple to start with robot simulators to play with. Three examples are listed below:
- Make code for Lego EV3 https://robotsandphysicalcomputing.blogspot.com/2020/05/programming-robots-virtually-3-lego-ev3.html
- iRobot simulator https://robotsandphysicalcomputing.blogspot.com/2020/04/programming-robots-virtually-2-irobot.html
- Vex robotics Vexcode VR https://robotsandphysicalcomputing.blogspot.com/2020/04/programming-robots-virtually-1-vexcode.html
It is the last one of these (https://www.vexrobotics.com/vexcode-vr) that is the focus of this post and return to hit, after an earlier discussion in https://robotsandphysicalcomputing.blogspot.com/2020/04/programming-robots-virtually-1-vexcode.html .
Two of the nice things about the package, apart from being free, are it uses a Scratch-like programming language and it provides a 3D environment and models - playgrounds for a number of scenarios.
So in this post, I will be discussing playing, or rather starting to play with the robot navigating a 3D maze (see the figure above). A feature I particularly like is you can change the views from an overhead view to an onboard version or one that seems to follow the robot.


So as I starting point I programmed it to essentially bounce along the walls keeping the wall on it's right and stopping when the downward 'eye' detects red on the floor for the end of the maze. The sensors include left and right bumper sensors; along with two sensors for detecting colours one facing forward and one down. The code I use is shown below:

It took 8 minutes to solve the maze - which is slow. I would be interested to see the solutions of others being shared. As a simulated robot programming system this is great fun and challenging, I would recommend having a play iot is free and available at https://www.vexrobotics.com/vexcode-vr. I want to have a go with the Python version to replicate or better the solution above (start it as a text project rather than a blocks project when starting a new project).

Saturday 1 September 2018
Build a Disco cube:bit that reacts to music.
In a previous post Micro:bit and Cube:bit 'says' Hello I introduced the start of me playing with the 4tronix Cube:bit. One of the things I want to try is get the cube to react to music, based around the accelerometers in a micro:bit picking up vibrations. Luckily, in an earlier post, I had done something similar for the Proto-Pic Micro:pixel (see Dancing Pixels for more details).
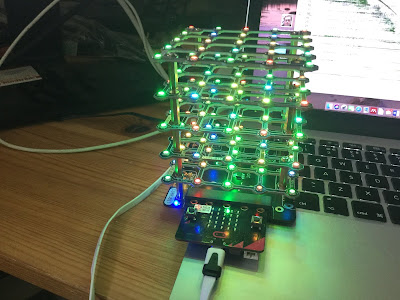
Essentially the idea is the vibrations from the music shake the micro:bit enough to give measurable changes in three axis, and these values are used to change the pixel's colour - in fact five pixels at a time.
The code shown below is all that was needed:
from microbit import *
import neopixel, random
np = neopixel.NeoPixel(pin0, 125)
while True:
for pxl in range (2,125, 5):
rd=int(abs(accelerometer.get_x())/20)
gr=int(abs(accelerometer.get_y())/20)
bl=int(abs(accelerometer.get_z())/20)
np[pxl] = (rd, gr, 0)
np[pxl-1] = (rd, gr, 0)
np[pxl+1] = (0, gr, rd)
np[pxl-2] = (rd, 0, 0)
np[pxl+2] = (0, gr,0)
np.show()
Here it is in action:
The music used in the video is
Please feel free to improve on this.
All opinions in this blog are the Author's and should not in any way be seen as reflecting the views of any organisation the Author has any association with. Twitter @scottturneruon
Monday 20 August 2018
Getting Crabby with EduBlock for Microbit
This is really pulling together two recent posts, one when I started playing with Edublocks for the microbit and one about playing with BinaryBots Crab .
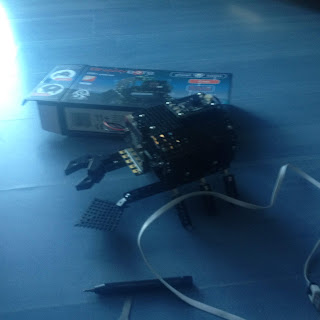 The BinaryBots Totem Crab is available at https://www.binarybots.co.uk/crab.aspx
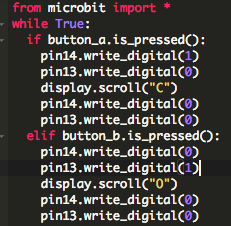
Here I going to use Edublocks (https://microbit.edublocks.org/) by @all_about_code to control the claw of the Crab to close when button A is pressed (and display a C on the LEDs) and open the claw when button B is pressed. For a discussion on the Crab and what the pins are, etc goto http://robotsandphysicalcomputing.blogspot.com/2018/08/crabby-but-fun.html for more details.

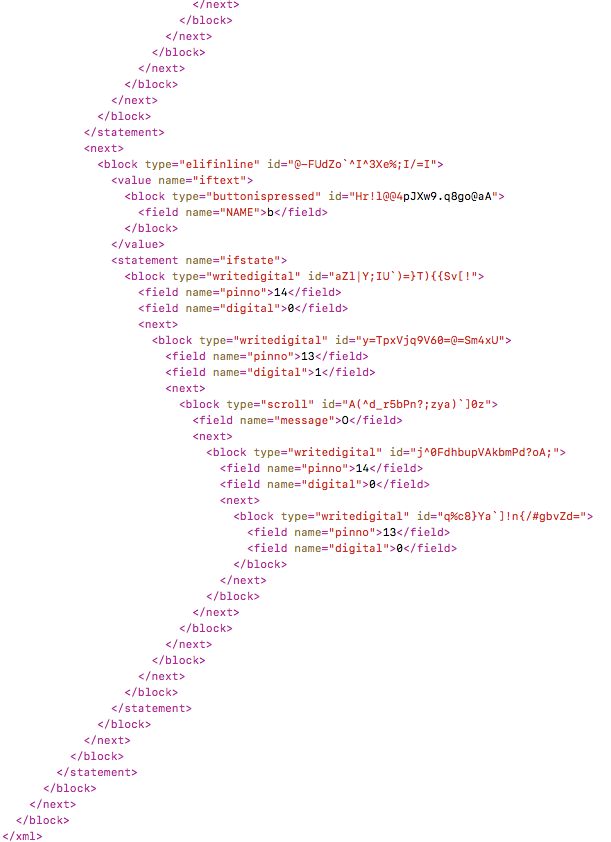
The timing of the opening and closing is controlled by how long the C or O takes to scroll across the LEDs. As an aside, but I found it interesting (it appeals to my geekiness), if you save the blocks, using the Save button; it stores it as an XML file, an example extract is shown below:

Now I want to explore a little the Python editor in Edublocks; to see if it can be used to expand the range of activities. The code as it stands now:
Using some code developed by CBiS Education/ BinaryBots I have added some code to read the Crab's temperature sensor and display "Warm" or "Cold" depending on this. The code uses the struct module to convert between strings of bytes (see https://pymotw.com/2/struct/) and native Python data types. to work with the I2C bus which the Crab sensors use (more details on the bus can be found https://microbit-micropython.readthedocs.io/en/latest/i2c.html ). The code below was then download as a hex file to the microbit as before.
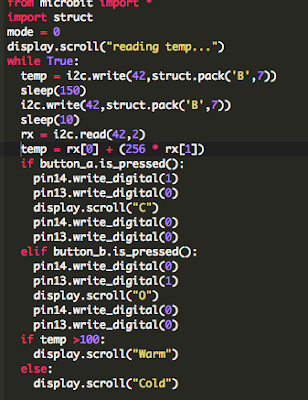
The Crab's reads in the temperature and displays either message "Warm" or "Cold" - currently repeatedly "Warm". The open and closing of the claws still works.
So this was a double win, I had a chance to explore whether the Edublocks Python works as advertised and it does and an opportunity to play with the Crab a bit more; a definite win-win.
Acknowledgement: Thank you to Chris Burgess and the team at Binary Bots/CBiS Education for sending me a copy of the Python code for accessing the sensors on the Crab.
All opinions in this blog are the Author's and should not in any way be seen as reflecting the views of any organisation the Author has any association with. Twitter @scottturneruon

Here I going to use Edublocks (https://microbit.edublocks.org/) by @all_about_code to control the claw of the Crab to close when button A is pressed (and display a C on the LEDs) and open the claw when button B is pressed. For a discussion on the Crab and what the pins are, etc goto http://robotsandphysicalcomputing.blogspot.com/2018/08/crabby-but-fun.html for more details.

The timing of the opening and closing is controlled by how long the C or O takes to scroll across the LEDs. As an aside, but I found it interesting (it appeals to my geekiness), if you save the blocks, using the Save button; it stores it as an XML file, an example extract is shown below:
Now I want to explore a little the Python editor in Edublocks; to see if it can be used to expand the range of activities. The code as it stands now:
Using some code developed by CBiS Education/ BinaryBots I have added some code to read the Crab's temperature sensor and display "Warm" or "Cold" depending on this. The code uses the struct module to convert between strings of bytes (see https://pymotw.com/2/struct/) and native Python data types. to work with the I2C bus which the Crab sensors use (more details on the bus can be found https://microbit-micropython.readthedocs.io/en/latest/i2c.html ). The code below was then download as a hex file to the microbit as before.

The Crab's reads in the temperature and displays either message "Warm" or "Cold" - currently repeatedly "Warm". The open and closing of the claws still works.
So this was a double win, I had a chance to explore whether the Edublocks Python works as advertised and it does and an opportunity to play with the Crab a bit more; a definite win-win.
Acknowledgement: Thank you to Chris Burgess and the team at Binary Bots/CBiS Education for sending me a copy of the Python code for accessing the sensors on the Crab.
All opinions in this blog are the Author's and should not in any way be seen as reflecting the views of any organisation the Author has any association with. Twitter @scottturneruon
Speech with EduBlocks on BBC microbit
The microbit is a great piece of kit, not least of which because of the range of programming languages and tools that can be used with it - officially JavaScript and Python and but there is also a range of third-party ones. A useful place to look for what languages/tools are available is http://microbit.org/code-alternative-editors/; listing both official and third-party tools (there was a few I wasn't aware of ). One I was aware and meaning to play with, is the brilliant Edublocks by Josh Lowe (@all_about_code) or more specifically in this post Edublocks for BBC Micro:bit (https://microbit.edublocks.org/).
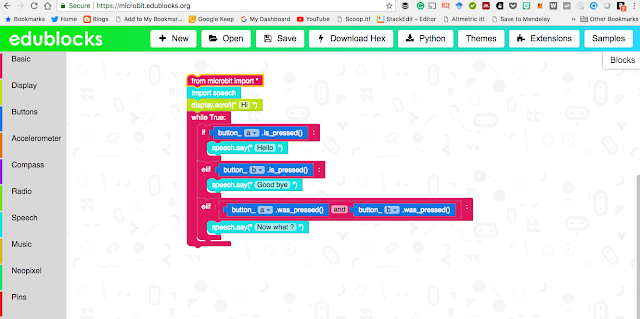
Edublocks for the microbit (and Edublocks in general) allows graphical blocks of code, in a similar way to languages such as Scratch, to be dragged and dropped into places. That in itself would be great, but the really useful thing here is though, whilst doing it you are actually producing a Python program (technically in the microbit case micropython)- a good way (as others have said before e.g https://www.electromaker.io/blog/article/coding-the-bbc-microbit-with-edublocks ) of bridging the gap between block based programming tand text-based programming language (ie. Python). Added to this is the support for Python on the microbit and the things like speech, access the pins and neopixels you have a really useful and fun tool.
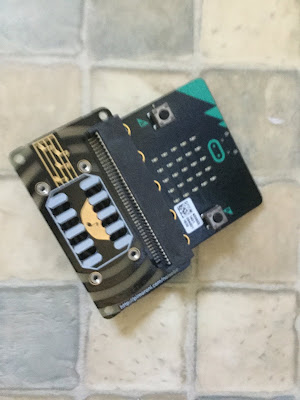
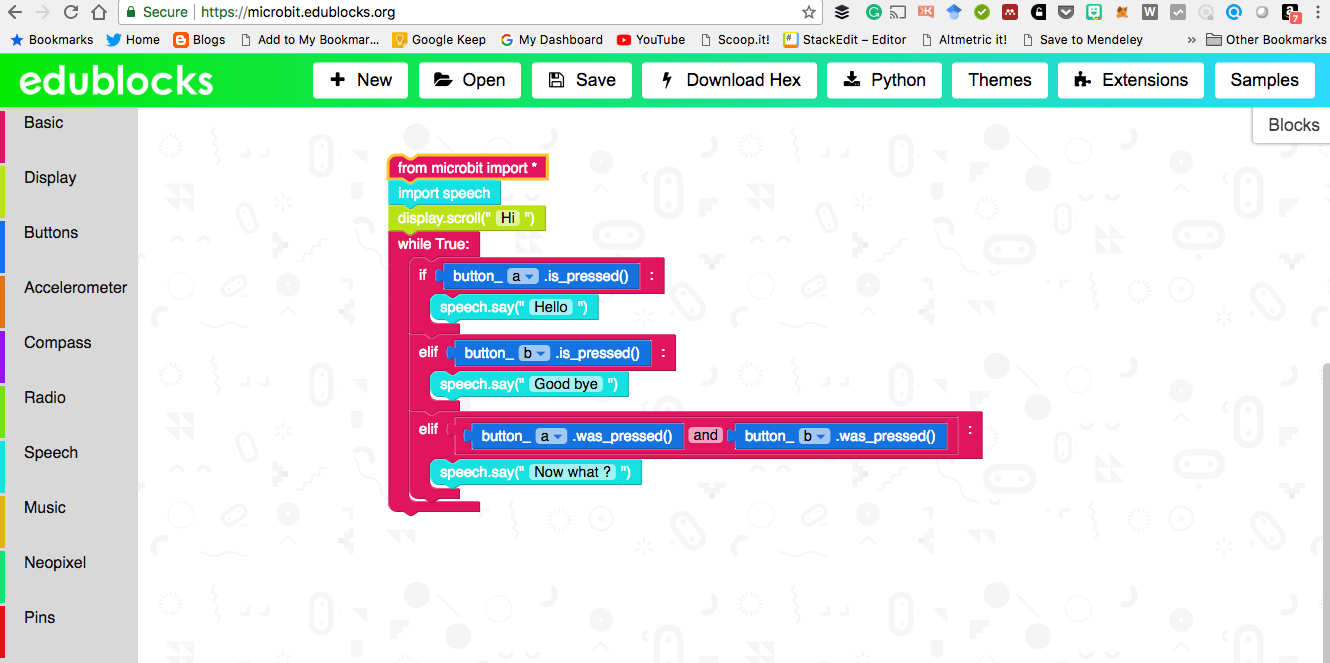
Talk is cheap (sort of!)
The project shown here is getting the microbit to 'talk' using speech. I have attached a microbit to Pimoroni's noise bit for convenience (https://shop.pimoroni.com/products/noise-bit) but equally, alligator wires and headphones could be used (https://www.microbit.co.uk/blocks/lessons/hack-your-headphones/activity ). The routine below allows when button A on the microbit is pressed the Microbit (through a speaker) to say Hello, B say Good bye and when both pressed Now what ? Simple but fun.
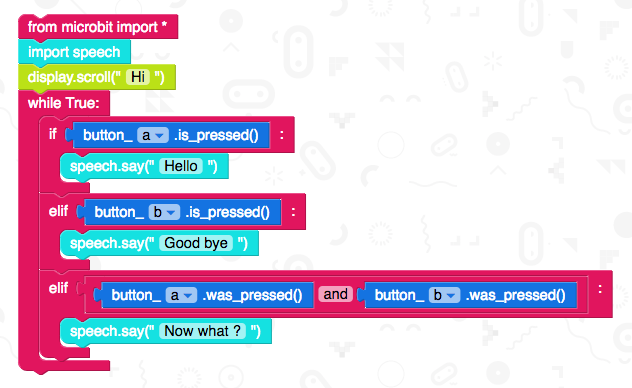 The equivalent Python code
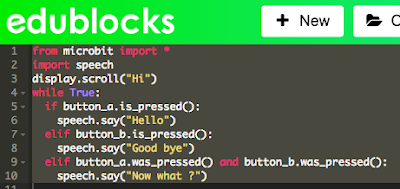 They are essentially the same.
Here is a video of it in action:
Thoughts.
As you might have gathered I think this Edublocks for the microbit is a fantastic tool. I am planning my new experiments with it now- coming soon to this blog. Edublocks for the microbit is not all Edublocks can do, the project itself can be found at https://edublocks.org/ is well worth a look. For playing with the microbit for the first time with Python I would recommend Edublocks for the microbit https://microbit.edublocks.org/
All opinions in this blog are the Author's and should not in any way be seen as reflecting the views of any organisation the Author has any association with. Twitter @scottturneruon
Edublocks for the microbit (and Edublocks in general) allows graphical blocks of code, in a similar way to languages such as Scratch, to be dragged and dropped into places. That in itself would be great, but the really useful thing here is though, whilst doing it you are actually producing a Python program (technically in the microbit case micropython)- a good way (as others have said before e.g https://www.electromaker.io/blog/article/coding-the-bbc-microbit-with-edublocks ) of bridging the gap between block based programming tand text-based programming language (ie. Python). Added to this is the support for Python on the microbit and the things like speech, access the pins and neopixels you have a really useful and fun tool.

Talk is cheap (sort of!)
The project shown here is getting the microbit to 'talk' using speech. I have attached a microbit to Pimoroni's noise bit for convenience (https://shop.pimoroni.com/products/noise-bit) but equally, alligator wires and headphones could be used (https://www.microbit.co.uk/blocks/lessons/hack-your-headphones/activity ). The routine below allows when button A on the microbit is pressed the Microbit (through a speaker) to say Hello, B say Good bye and when both pressed Now what ? Simple but fun.


Here is a video of it in action:
Thoughts.
As you might have gathered I think this Edublocks for the microbit is a fantastic tool. I am planning my new experiments with it now- coming soon to this blog. Edublocks for the microbit is not all Edublocks can do, the project itself can be found at https://edublocks.org/ is well worth a look. For playing with the microbit for the first time with Python I would recommend Edublocks for the microbit https://microbit.edublocks.org/
All opinions in this blog are the Author's and should not in any way be seen as reflecting the views of any organisation the Author has any association with. Twitter @scottturneruon
Subscribe to:
Posts (Atom)
Top posts on this blog in March 2024
The Top 10 viewed post on this blog in March 2024. Covering areas such as small robots, augmented reality, Scratch programming, robots. Micr...